Merchant Console Recurring Billing
The Recurring Billing page enables you to set up and monitor recurring billing cycles for multiple customers. Recurring billing cycles can be set to charge a customer's card automatically according whatever schedule you choose to set. Each time a recurring charge is run, a report is generated and a receipt sent to your email and the customer's email. To set up the address at which you would like to receive these reports, please go to the Settings section of your Merchant Console.
Customer Database
Using Recurring billing as a Database
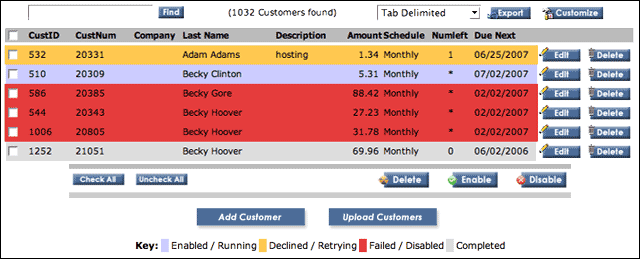
The Customer Database section contains all customers who have been entered into the recurring billing database including customers who are no longer active, or who have been temporarily disabled. The database is indexed by the customer's last name, but you can change the index by clicking on the name of the field you would like to use at the top of the list. The database will display 100 customers per page (there is a tab at the bottom of the screen to move to the next page).
The default settings for this page include the following:
| Field | Description |
|---|---|
| CustNum | a gateway assigned customer identification number |
| Company | |
| Description | a brief description of the goods or services being compensated |
| Amount | |
| Schedule | how frequently the customer is automatically charged (for possible options see also: Billing Schedule) |
| NumLeft | number of transactions remaining in the recurring billing cycle (should be set to [*] if there is no set end date) |
| Due Next | date of next automatic transaction |
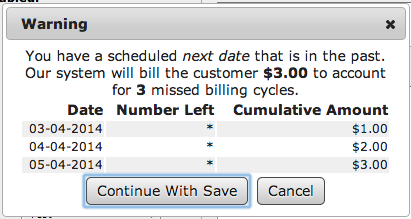
When you select a value for the Start date it now automatically will set the Next date to the same value as long as the Sate date is ahead of the Next date. 
If you set the Next date into the past, a warning will pop up when you hit save. The warning will include how much will be charged to catch the customer up to the current date.
Note: If a Due Next date that does not exist within a given month is entered (e.g. February 31st), the transaction will be billed on the first day of the next month.
You can customize in advanced or simple interface.It can also include information from the payment methods added. If you have multiple payment methods added, the customer database will show just he card number from the first payment method.
Customize Display
The display page can be customized by clicking the Customize button at the top of the page and adding or subtracting fields to be displayed. Possibilities in addition to the default options are:
| Field | Description |
|---|---|
| CustID | a merchant assigned customer number |
| First Name | |
| Address | |
| Address2 | |
| City | |
| State | |
| Zip | |
| Country | |
| Phone | |
| Fax | |
| Receipt | denotes whether or not the customer is automatically sent a receipt each time they are charged |
| Receipt Note | displays the note that is emailed to the customer along with their receipt |
| Notes | displays any notes that you have added to the customer's record - this is only visible to you, not to the customer |
| Enabled | denotes whether a customer is currently enabled for recurring billing (see also: Key) |
| Start | date the recurring billing cycle was initiated |
| Failures | number of failures that have occurred for this customer |
| Order ID | |
| Balance | displays the balance remaining to be billed to customer |
Find Customer
You can search the recurring billing customer database to find a particular customer, or group of customers, by entering the CustNum (a gateway assigned customer identification number) or the customer's last name.
Edit Customer
Clicking the Edit button to the right of a customer's row will bring you to a screen that allows you to edit most aspects of a customer's information. You can use this screen to change a customer's recurring billing status and update payment and address information.
The Edit form is identical to the Add Customer form and includes the customer's billing history beneath the form. Please refer to the Add Customer documentation for more details.
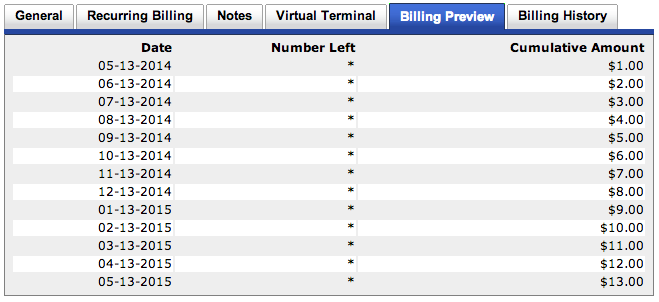
When editing a customer, the billing preview tab will show each upcoming recurring billing. Each line includes the date the transaction will run, how many transactions will be left after it runs, and the total amount that will have been charged to the customer including that transaction.
Delete Customer
Located to the far right of the information table, the Delete button allows you to quickly and easily delete customer's are no longer enabled for recurring billing and remove them from the recurring billing customer database. When you click the Delete button you will be asked to confirm the deletion. Upon deletion of customer, all customer information stored in the recurring billing customer database will be erased. You can not undo this action.
Export Customer Database
The recurring billing customer database may be exported by selecting the type of file you would like to export (csv or tab delimited) and clicking the "Export" button. The data can then be accessed via an offline program such as Microsoft Excel, Quicken or Quick Books.The export also can include any custom fields that you use.
The customer database export can also include the payment methods. When you perform an export, you will get a separate line for each payment method.
For Example: CustNum First Name Payment Method Card Number
-
12345 John Doe My Visa xxxxxxxxxxxx7779
-
12345 John Doe My MasterCard xxxxxxxxxxxx1111
Color Legend

The customer database is organized by color according to each customer's recurring transaction status.
-
If a customer is enabled for recurring billing and their credit card or checking account is in good standing, their row will be shaded blue.
-
If a customer's charge did not go through, or encountered an error, the system will retry for up to three days from the initial transaction allowing enough time to edit and update the customer's payment information, and the customer's row will be shaded orange.
-
If a customer is not enabled for recurring billing, or if a customer's card has been fully declined, or the three day period has expired, their row will be shaded red.
-
If a customer has complete their recurring billing cycle (and either reached the set end date, or total number of transactions to run) their row will be shaded gray.
Delete, Enable & Disable Customers
To change the status of a single customer or a batch of customers, click the small check boxes to the left of each customer's row. You can also change the status of an entire group of customers by using the Check All button located at the bottom left of the customer table. Any checked customers can then be deleted, enabled or disabled for recurring billing, using the Delete, Enable, and Disable buttons located at the bottom right of the customer table. These tools can also be used in conjunction with the "Find" tool if you want to delete or change the status of a specific batch of customers.
Import/Upload Customers
You can upload batches of customers using the Upload Customers button at the bottom of your screen. Clicking the button will take you to a new screen where you can browse for the file you wish to upload into the database. It is recommended that you use a comma separated text format for importing. Please note, if you are using Excel to create your file, make sure to set the cell format of the ccnum column to text before entering numbers. Switching the format after entering card numbers could corrupt the numbers.
In addition to adding new customers, you can also update existing customer data via upload.
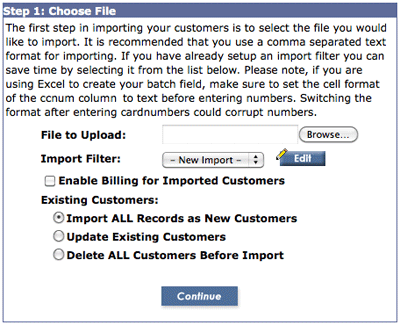
You can use an Import Filter to organize the incoming data.
The following steps are required to successfully import an existing customer file.
- Click the Browse button.
- Select the file you wish to upload from your hard drive.
- Select an Import Filter, or choose New Import. (If this is your first import, choose New Import; you will have a chance to save your filter setting later.)
- Enable Billing for Imported Customers (uncheck to keep billing for new customers disabled and enable later if necessary)
-
Select action for existing customers:
- Select "Update Existing Customers" if the file you are about to upload contains updated information on existing customers. Warning: existing customer database information will be replaced with new data.
- Select "Import ALL Records as New Customers" to keep existing customer information and add the new customers to your customer database.
- Select "Delete ALL Customers Before Import" to eliminate all existing customer data and replace your entire customer list with the newly imported customer information.
- Click continue when ready.
Map Fields
If you select New Import, you will need to map the fields before the items can be added to the customer database. Select a category for each column (Name, CustNum, Address, Phone, etc.) based on what information it contains. When you are done, click Continue at the bottom of the screen. (You'll have the chance to save the mapped fields in a moment.)
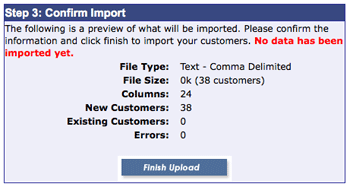
Confirm Import
Double check the information that will be imported, including file size, type and number of customer records to be imported, then click "Finish Upload" to continue and save the customers to the database.
Import Completed/Import Saved
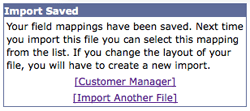
The Import Completed screen displays the results of your import. On the Import Completed screen, enter a name for the import filter settings to save them for future use. Once you have saved your settings, the name of the import filter will appear in the drop down menu on the initial import screen.
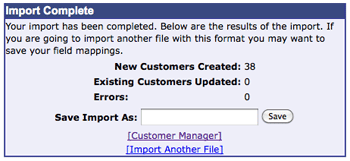
To return to the Customer Database without saving, click the Customer Manager link below the Import name field.
To import another file without saving your import settings, click the Import Another File link.
If you save your settings, you will be taken to the final confirmation screen from which you can return to the products manager or import another file.
Add Customer
This button will take you to a form that contains fields for all of the information necessary to enter a new customer into your recurring billing database. The Add Customer page includes the following fields:
| Customer Information | |
|---|---|
| CustNum | a gateway assigned customer identification number |
| Company | |
| First Name | Customer's first name as it appears on their credit card or checking account. |
| Last Name | Customer's last name as it appears on their credit card or checking account. |
| Address | |
| Address2 | |
| City | |
| State | |
| Zip | |
| Country | |
| Phone | |
| Fax | |
| Web Site | |
| Send Customer Receipt | if checked, an email receipt will be sent to the customer after each charge in the billing cycle |
| Receipt Message | message to be included on the customer's email receipt |
| Billing Schedule | |
| Schedule Enabled | if checked, customer will be enabled for recurring billing |
| Schedule | set the customer's recurring billing schedule from the drop down menu |
| Start | date to begin billing cycle |
| Next | date of next scheduled transaction - customer will be charged at the time specified in the Recurring Billing section of your General Settings (default is 11:00 PM) |
| Num Left | number of transactions remaining in billing cycle (set to * for infinite) |
| Amount | amount that will be charged |
| Order ID | create a unique order ID |
| Description | a brief description of the good or services being charged |
| Source | set the source of the billing cycle (for reporting purposes) |
| User | set the user who entered the information (for reporting purposes) |
| Credit Card Payment Information | |
| Card Num | 16 digit credit card number without dashes or spaces |
| Expiration | credit card expiration date in MMYY format |
| Check Payment Information | |
| Routing # | 9 digit bank routing number |
| Account # | customer's bank account number |
| Social Security # | checking account holder's social security number |
| Driver's License | checking account holder's driver's license number |
| License State | checking account holder's driver's license state of issue |
| Notes | provides space for you to leave a reminder or note to yourself regarding the customer's account |
Custom Fields
These fields can be customized to include any information you would like to have in the customer's record. Click on the Edit Custom Fields link at the bottom of the box and you will be taken to a page into which you can enter the names of any fields you like.
Billing History
After each transaction is run, it is added to the Billing History database and also to the Reports section of the Merchant Console.
This page includes the following transaction data:
| Field | Description |
|---|---|
| Date | last time transaction was run |
| ID | order ID for transaction |
| Company | |
| Name | |
| Amount | |
| Result | result of the transaction (possible values are: A - Approved, E - Error, or D - Declined) |
| Reason | explanation of error or decline |
Transaction Details
To view any of the transactions listed in the Billing History, click the Details button to the right of the transaction. The details page includes all of the data for the specified transaction including Transaction Results, Verified by Visa Authentication, Transaction Info, Billing Address and Shipping Address.
The Transaction Details page also includes a Quick Credit option which allows you to issue a credit to the customer whose transactions you are viewing. There is also a Quick Sale option, through which you can charge a customer a one time fee or charge that will not affect the customer's recurring transaction schedule.
Please note: The Quick Credit, and Quick Sale options DO NOT ask you to confirm the transaction once you submit them, they will be processed immediately.
Source Summary
The Source Summary page provides you with a snapshot of all customers currently contained within your recurring billing customer database. They are organized by Enabled/Running (all currently enabled customers whose cards are in good standing), Declined/Retrying (customers whose transactions have encountered temporary errors, will be retried within a three-day period), and Failed/Disabled (customers whose cards have been permanently declined or whose recurring billing status has been disabled).