Merchant Console Batch Uploader
The Batch Uploader allows you to upload files in comma or tab delimited formats and submit them to the gateway for processing. This feature is useful for merchants who prefer to process all of their transactions at once instead of one at a time.
Comma & Tab Delimited File Formats
The Batch Uploader supports two file formats for upload, comma and tab delimited. If you are using Microsoft Access or Microsoft Excel, save your transactions file/database as a CSV or comma delimited file. If you are using Microsoft Word or a similar text based program, save your file as a tab delimited text file. Developers using SQL or Oracle databases are also able to export your files in either of these formats.
Batch Template
These files includes basic information for uploading Credit Card and ACH transactions. The file your uploading must be in .csv format.
Supported Fields for Uploads
Along with basic fields such as the customer's name and credit card information, the uploader also supports all of the fields that are generally allowed by the gateway. For a complete list of all allowed fields, please refer to the CGI Variable and Form Fields table on the Gateway API support page.
Please note: All fields included in the file to be uploaded must be in the API specified format. For example, credit card numbers must contain only numeric digits with no spaces or dashes between the numbers and the expiration date must be entered in MMYY format. Any required formats are explained in the CGI Variable and Form Fields table referenced above.
Supported Commands and Required Fields
| Type | Commands | Required Fields |
|---|---|---|
| Credit Card Sale | cc:sale | Amount, Invoice, Card Number, Expiration Date, Cardholder |
| Auth Only | cc:authonly | Amount, Invoice, Card Number, Expiration Date, Cardholder |
| Credit Card Open Refund | cc:credit | Amount, Invoice, Card Number, Expiration Date, Cardholder |
| ACH Sale | check:sale | Amount, Invoice, Routing Number, Account Number |
| ACH Open Refund | check:credit | Amount, Invoice, Routing Number, Account Number |
Order of Fields and Mapping Filters

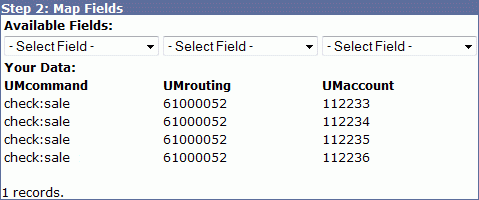
The first time you upload a file, you will be required to map the data, by assigning the appropriate heading to each column allowing the system to accurately read and process the data. (See image of this process above.) Once you have completed this process for the first time, you can save the map as an import filter for use with future files, and it will not be necessary to go through the mapping process again. There is no particular order in which your fields or columns must be organized, but once you save your map, you must duplicate the order of the fields/columns in future files or the data may be misread by the system. You can also create more than one map to be saved for use with different file types and/or differently ordered data.
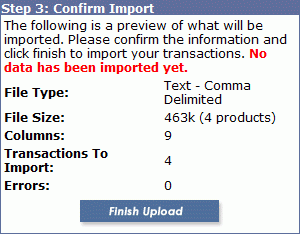
Confirmation of Upload
Once the mapping is complete, the system will ask you to review the upload one last time. It will list the file format, the file size (in KB), the number of transactions to be processed, total number of columns, and number of errors (if any). Double check that the information is correct and complete your upload.
An error may be something as simple as an empty field, or an incorrect file type.
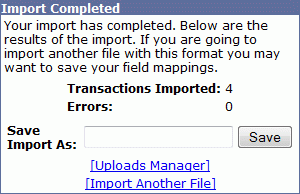
What Happens Next?
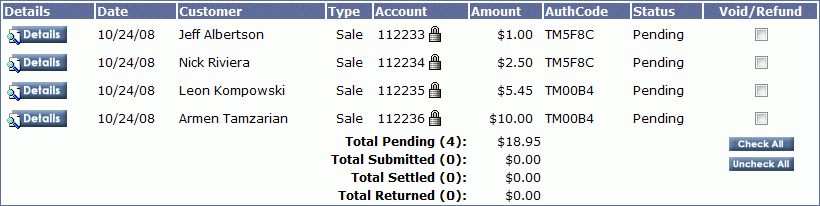
Once your batch as been successfully uploaded, and the transactions have been processed, you can view all of the approved transactions in your current open batch in the Batch Manager where they will be awaiting settlement. Transactions that resulted in error or were declined can be views in the uploaded file report in the Upload Manager or the Reports section of your Merchant Console.
Check Upload Tutorial
Uploading checks to the merchant console is a simple process. This section will give you step by step instructions on how to upload a batch containing checks. For simplicity's sake, the sample batch contains checks only, but you can upload checks and credit cards together as long as you specify the command for each transaction. Checks will have the command of check:sale as per the transactionAPI.
- Create your .csv or .tsv file. Make sure that all the necessary fields are included - routing number, account number, driver's license number, and driver's license state. SSN is no longer necessary to process checks. If you are working in Excel, it is very important to make sure that all cells are formatted as Text in order to preserve leading zeros.

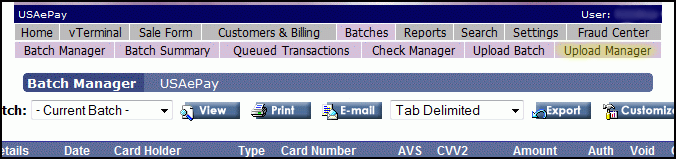
- Log into your Newtek Gateway acount. Click Batches, then click Upload Manager to get to the uploads screen.
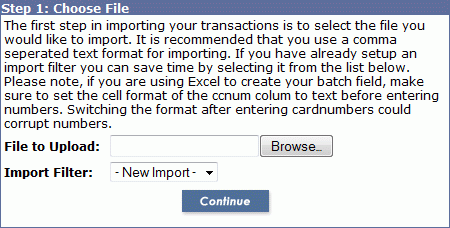
- Click the Browse button and locate your batch file. If you have uploaded previously, you can select a filter. If you have not uploaded previously, there will not be a filter for you to select.
- Name each column. You can also specify to skip the column if the information is redundant.
- Verify the upload. If a number is listed after "Errors", go back and make sure that the batch information is correct.
- Once your upload is complete, go to the Upload Manager.
Peak traffic or high numbers of transactions can result in a slower upload. If your upload does not appear to be processing at all, even after waiting several minutes, you may wish to contact Customer Support. Once your Upload Manager has completed importing all transactions, you can view them in your Check Manager.