Tutorials
The following is a list of tutorials for compatible software (shopping carts/e-stores/e-store builders). Please Note: This is NOT the full list of integrations. Click here for a list of compatible shopping carts or here for a list of compatible point-of-sale systems.
Index
| Cart/eStore Name | Tutorial | Payment Module | PIN Support | Commercial(Paid)/Open Source(Free) |
|---|---|---|---|---|
| 3DCart | Tutorial | Built-in | Yes | Commercial |
| AppFrontier | Tutorial | Built-in | Yes | Commercial |
| CartManager | Tutorial | Built-in | No | Commercial |
| CartWeaver | Tutorial | Payment Module | No | Commercial |
| CommerceV3 | Tutorial | Build-in | Yes | Commercial |
| iStores | Tutorial | Built-in | No | Commercial |
| Lavu POS | Tutorial | Built-in | Yes | Commercial |
| Magento | Tutorial | Payment Module | Yes | Open Source |
| Magento 2 | Tutorial | Payment Module | Yes | Open Source |
| osCommerce | Tutorial | Payment Module | No | Open Source |
| SearchFit | Tutorial | Built-in | Yes | Commercial |
| Volusion | Tutorial | Built-in | No | Commercial |
| Wordpress eCommerce | Tutorial | Payment Module | Yes | Open Source |
| Wufoo | Tutorial | Built-in | No | Commercial |
| Zen Cart | Tutorial | Payment Module | Yes | Open Source |
CartManager
The following is a step by step tutorial describing the Newtek Gateway Gateway Payment Settings.
Tutorial
Step 1
Please navigate your browser to the administration area of CartManager by going to the web address www.cartmanager.com and logging in using your provided CartManager credentials.
Step 2
Once you're logged in please click on "4. Payment/Gateway Settings" link. Drop down the menu next to "Gateway" and select Newtek Gateway. The following page should look similar to this.
- Source Key- Enter your Newtek Gateway generated source key from your account. NOTE: this is not your login name OR password, this is a 32 character alphanumeric unique passphrase.
- Currency Symbol- By default the shopping cart displays the dollar symbol "$". You can use this setting to change the symbol that your shoppers will see. This should match the currency used by your Newtek Gateway gateway account. Please consult your merchant service provide if you're not sure. Currently supported symbols are
- $ - USD - US Dollar
- $ - AUD - Australian Dollar
- $ - CAD - Canadian Dollar
- £ - GBP - British Pound
- € - EUR - Euro
- ¥ - JPY - Japanese Yen
- Cart Mode- Select "Normal" to process a real charge or "Test" to run a test transaction. NOTE: Test transactions will be sent with the test mode flag on and will NOT be reflected in the merchant console therefore not be a real charge.
- Type of Transaction Process
- If you select Authorize Only (Suggested when shipping the product) this will authorize your customer's credit card and you should see the transactions in the Queued Transactions area of the Batch Manager in your Newtek Gateway Merchant console. You will need to capture the funds manually in order to settle the transaction.
- If you select Capture (Suggested for softgoods, downloads, memberships) this will process the charge immediately and you should see your transactions in the Batches area of your Newtek Gateway Merchant console.
- What Payment Methods Do You Accept?- Check all of the different payment methods that you accept.
- Type(s) of Order Transactions Allowed- Select "By Credit Card with Real-Time Processing (OnlineOrder)" to process using the Newtek Gateway gateway.
- Extra Card Information
- Select "Required" from the drop down menu.
- Check "Collect Expiration Day on Cards (Month/Year are always collected)" to collect the expiration date, recommended.
Step 3
Click "Save" to save the settings
Step 4
Run a small sale through your website and verify you see the transaction in the Batches area of your merchant console.
CartWeaver
This page provides a guide for downloading and installing a Newtek Gateway module for Cartweaver and v1.4.3 of the Newtek Gateway PHP library.
Download
- Version: 1.0.0 (10/21/2009)
- Download: newtek-cartweaver.zip
Note: To use this module, you must use an older version of the Newtek Gateway PHP library, v1.4.3 - this library has been bundled with the Newtek Gateway module for your convenience.
Tutorial
Step 1
Install the files in the /cw3/CWLibrary/ProcessPayment/ folder.
Step 2
Edit the customer source key in the CWIncUSAepay.php file.
Step 3
Set the payment method in the application.php file:
$cwGlobalSettings->paymentAuthType = "gateway";
$cwGlobalSettings->paymentAuthName = "CWIncUSAepay.php";
CommerceV3
Tutorial
The following is a step by step tutorial describing the Newtek Gateway Gateway Payment Settings. Please navigate your browser to the administration area of CommerceV3 by going to the web address http://www.commercev3.com/ and logging in using your provided CommerceV3 credentials.
Once you're logged in please click into the store, and the part you want is under Settings / Options / Payment Options / Credit Card Options, and then select from the dropdown for "Choose the type of payment gateway you would like to use:" The following page should look similar to this.
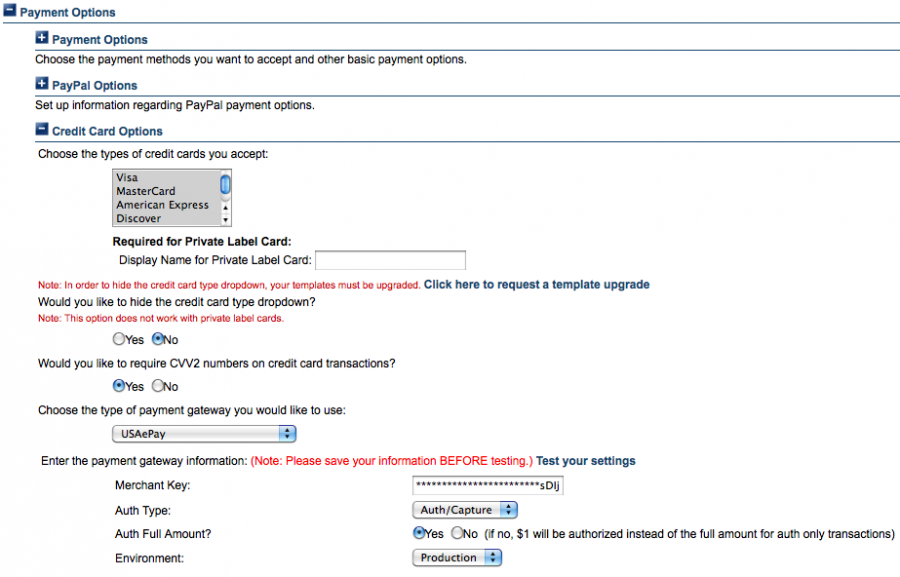
- Merchant Key- Enter your Newtek Gateway generated source key from your account. NOTE: this is not your login name OR password, this is a 32 character alphanumeric unique passphrase.
- Auth Type
- If you select "Auth Only (Suggested when shipping the product)" this will authorize your customer's credit card and you should see the transactions in the Queued Transactions area of the Batch Manager in your Newtek Gateway Merchant console. You will need to capture the funds manually in order to settle the transaction.
- If you select "Auth/Capture (Suggested for softgoods, downloads, memberships)" this will process the charge immediately and you should see your transactions in the Batches area of your Newtek Gateway Merchant console.
- Auth Full Amount
- If you select "Yes", the full amount of transaction will be used for authorization.
- If you select "No", $1 will be authorized instead of the full amount for auth only transactions.
- Environment
- Select "Production" to process a real charge or "Test" to run a test transaction. NOTE: Test transactions will be sent with the test mode flag on and will NOT be reflected in the merchant console therefore not be a real charge.
Click "Submit" to save the settings. Run a small sale through your website and see if it ends up in the Batches area of your merchant console.
iStores
Tutorials
Step 1
Direct your favorite browser to www.istores.com. In the member sign in area type your site name and password and click Sign In.

Step 2
Click on the Store Manager icon.
Step 3
Under the Store Settings menu click the "Payment Methods/Merchant Account" link
Step 4
Locate the "Payment Gateway Configuration Area" and click on the "Gateway" dropdown. Select Newtek Gateway and click "Set". In the Key are paste your Newtek Gateway Merchant Console generated source key. Check "enable CVV" if you wish and click "Save Configuration" button. Finally click the "Apply Changes" button below.
Step 5
Go back to your website and make a small purchase. If everything was successfull then you will see your purchase as a transaction in the Queued Transactions screen of your Newtek Gateway Merchant Console.
Lavu POS
Tutorial
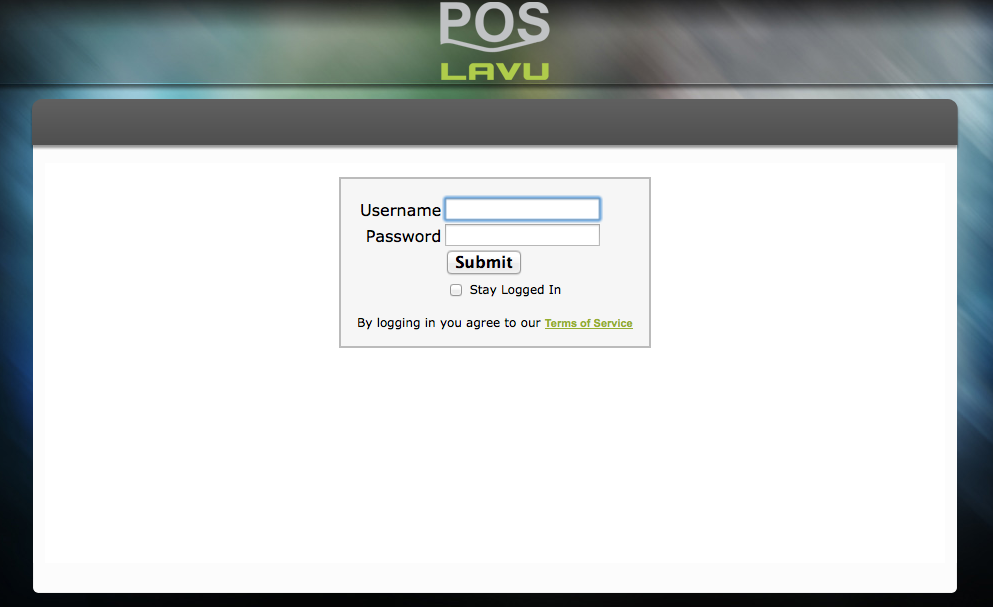
Step 1
First start off with logging into http://admin.poslavu.com/cp/|POSLavu
Step 2
Go to settings > Advanced Location Settings > Credit Card Integration
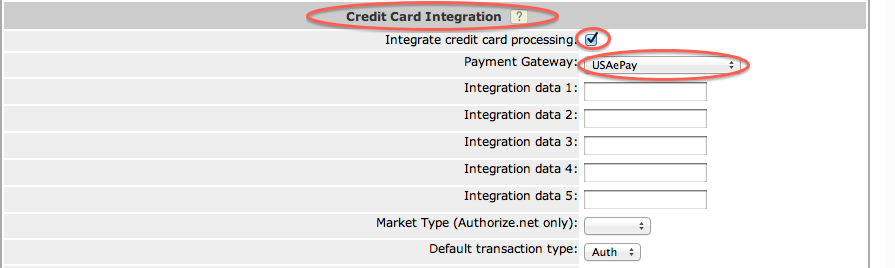
Step 3
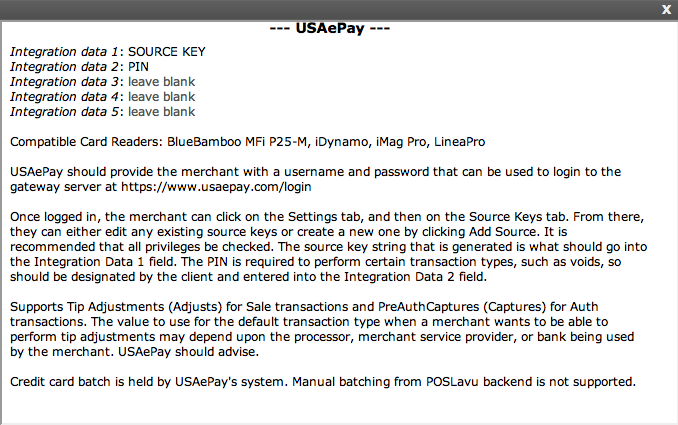
Select the "?" Icon.
Step 4
See the setup directions pertaining to Newtek Gateway.
Magento
Magento is a popular opensource ecommerce platform that represents the next generation in shopping carts, ecommerce technology and web standards. The Community Edition can be downloaded free. For those who need enterprise features and support, a Commercial Edition is also available.
Newtek Gateway maintains and supports a payment gateway extension for Magento 1.7 or later. This page contains instructions for installation of the module, a guide to the configuration options and troubleshooting assistance.
Additional information is also available on our connect page.
Installation
Installation via Magento Connect
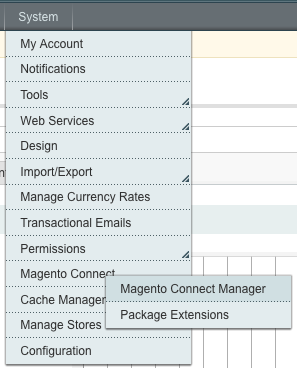
The easiest way to install the module is to use the Magento Connect Manager. This is located under System - Magento Connect menu within your Magento admin area.
Paste the extension key into the appropriate field and click on the "Install" button:
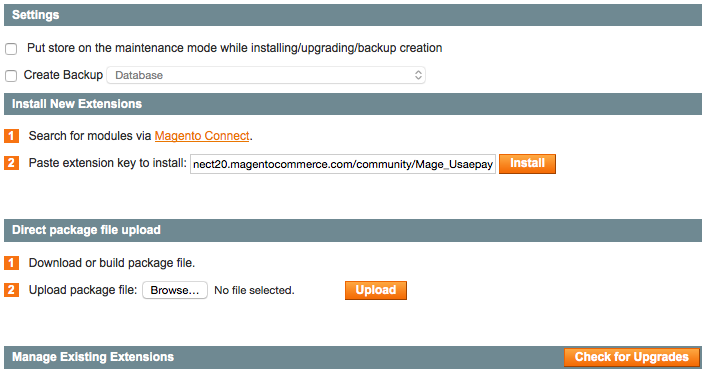
Once the install is complete you should be able to return to the admin console. If installation was successful you should now see Newtek Gateway listed in the Payment Methods section of the configuration screen. You can find this by going to the System menu and choosing "Configuration." The Payment Methods section is listed under "Sales."
If you do not see Newtek Gateway in the list of Payment Methods, it is possible that this screen is cached. Try clicking the "Save Config" button in the top right corner to refresh the screen.
Installation via FTP (harder)
If for some reason you are not able to use Magento Connect, you can manually upload the plugin files to your magento folder via FTP.
Start by downloading the Newtek Gateway Magento plugin: - Zip Format
Once downloaded, unzip/unpack the file. You should now have a folder called Mage_Usaepay-1.1.9.1:

These files must be uploaded into the same folders within your magento folder on your webserver. If you are not familiar with how to upload files to your website, please contact your web hosting provider.
Once these files are uploaded you should be able to log into your magento admin console. If installation was successful you should now see Newtek Gateway listed in the Payment Methods section of the configuration screen. You can find this by going to the System menu and choosing "Configuration." The Payment Methods section is listed under "Sales."
If you do not see Newtek Gateway listed in the list of Payment Methods, it is possible that this screen is cached. Try clicking the "Save Config" button in the top right corner to refresh the screen.
If something goes wrong and your site is no longer operational, use your FTP program to remove the "app/etc/modules/Mage_Usaepay.xml" file. This will disable the Newtek Gateway extension.
Configuration
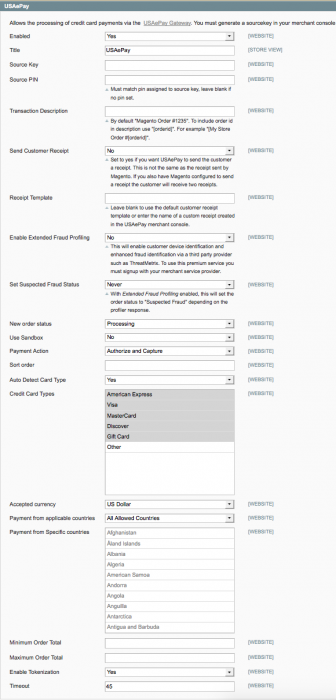
To configure the module go to the System menu and choose "Configuration." Then click on "Payment Methods" listed under the Sales section of the left hand bar. Then click on "Newtek Gateway." You should then see a config screen that looks like:
To enable the Newtek Gateway module:
- Set Enabled to True
- Paste your source key into the Source Key field. (This key must be created in your newtek merchant console.)
- Enter your source key pin. This must match the pin that was entered when the source key was created. If you do not have one, leave this field blank.
- Change Accepted Currency to US Dollar.
- Click on the "Save Config" button.
You should now be able to process credit cards via your Newtek Gateway account.
Configuration Options
- Payment Action- Select 'Authorize and Capture" to make an immediate charge. Select 'Authorize Only' to authorize the card and then manually settle the funds at a later time (such as during shipping).
- Title- Select a title for this Payment Option such as 'Secure Credit Card' or 'Newtek Gateway'.
- Source Key- Please enter your USA ePay Source Key. Input your source key generated from your Newtek Gateway merchant console
- Source PIN- Enter a pin, if applicable.
- Transaction Description- Enter a description that will appear on all transactions or use #[orderid] to display the order ID.
- Accepted Currency- Unless you have a Multi-Currency gateway account this is always US Dollars.
- New Order Status- Select the status that will appear on all new orders.
- Use Sandbox- Select "No" to send transactions to your main Newtek Gateway account. Select "Yes" to send transactions to a "sandbox" test environment.
- Sort Order- If you have multiple payment options enter 1 to have this payment module be first.
- Payment from applicable countries- If you accept payments from all countries select this option or select Specific and the next section will be active.
- Payment from specific countries- Select specific countries to accept payment from.
- Minimum Order Total- Enter the dollar amount for a minimum order.
- Maximum Order Total- Enter the dollar amount for a maximum order.
Trouble Shooting
Custom Template
The module installs its template file into the default template directory only. If you have created a custom template, you will most likely get an error using our extension. The error should look something like:
Warning: Mage_Core_Block_Template::include
(.../app/design/frontend/YOURTEMPLATE/default/template/newtek/form.phtml)
[mage-core-block-template.include]: failed to open stream: No such file or
directory in .../app/code/core/Mage/Core/Block/Template.php on line 144
If you get this error, copy the folder app/design/frontend/default/default/template/newtek/ to app/design/frontend/YOURTEMPLATE/default/template/newtek where YOURTEMPLATE is the name of your custom template.
Error reading from card processing gateway
It is not a full error message. To show the underlying curl error you can change the following line:
Mage::throwException(Mage::helper('paygate')
->('Payment authorization error: ' . $tran->error .
'('.$tran->errorcode . ')'));
To:
Mage::throwException(Mage::helper('paygate')
->('Payment authorization error: ' . $tran->error .
'('.$tran->errorcode . ') ' . $tran->transporterror));
in app/code/community/Mage/Usaepay/Model/CCPaymentAction.php
Certificate verification problems
Payment authorization error: Error reading from card processing gateway.(10132)SSL certificate problem, verify that the CA cert is OK.
Details: error:14090086:SSL routines:SSL3_GET_SERVER_CERTIFICATE:certificate verify failed
- Upload curl-ca-bundle.crt to
D:\username\app\code\community\Mage\Usaepay\Model\curl-ca-bundle.crt - Add the following to
D:\username\app\code\community\Mage\Usaepay\Model\CCPaymentAction.php' right above $tran->Process();
$bundle = dirname(__FILE__) . '/curl-ca-bundle.crt';
$tran->cabundle = $bundle;
Magento 2
Magento 2 is a popular opensource ecommerce platform that represents the next generation in shopping carts, ecommerce technology and web standards.
Newtek Gateway maintains and supports a payment gateway extension for Magento 2.0 or later. This page contains instructions for installation of the module, a guide to the configuration options and troubleshooting assistance.
Installation via FTP
To install Newtek Gateway module for Magento 2 just upload the plugin files to your magento folder via FTP. Start by downloading the Newtek Gateway Magento plugin:
Once downloaded, unzip/unpack the file. You should now have a folder called "Usaepay"

These files must be uploaded into the same folders within your magento folder on your webserver. You would put it into "app\code" directory. Example: app\code\ZS... If you are not familiar with how to upload files to your website, please contact your web hosting provider.
Once these files are uploaded you should be able to log into your magento admin console. If installation was successful you should now see Newtek Gateway listed in the Payment Methods section of the store's configuration screen. You can find this by going into the Stores > Sales > Payment Methods.
If you do not see Newtek Gateway listed in the list of Payment Methods, it is possible that this screen is cached. Try cleaning the cache in Magento.
Configuration
To configure the module go to the Stores > Sales. Then click on "Payment Methods" listed under the Sales section of the left hand bar. Then click on "Newtek Gateway." You should then see a config screen that looks like:
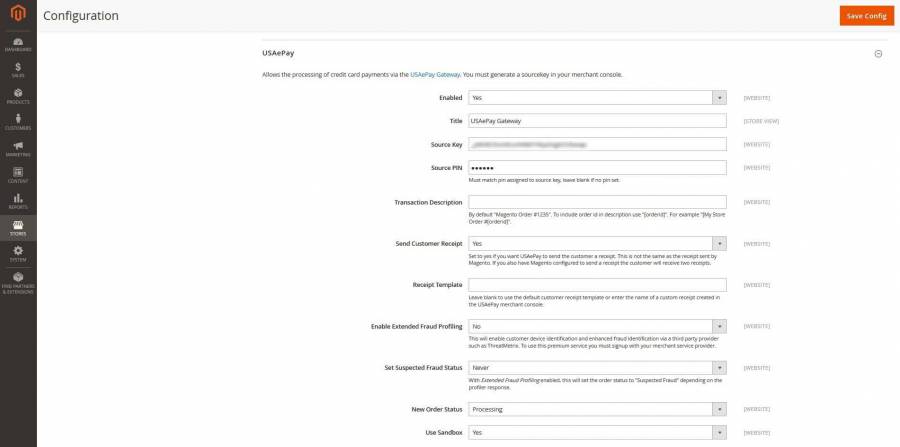
To enable the Newtek Gateway module:
- Set Enabled to True
- Paste your source key into the Source Key field. (This key must be created in your newtek merchant console.)
- Enter your source key pin. This must match the pin that was entered when the source key was created. If you do not have one, leave this field blank.
- Change Accepted Currency to US Dollar.
- Click on the "Save Config" button.
You should now be able to process credit cards via your Newtek Gateway account.
Configuration Options
- Payment Action- Select 'Authorize and Capture" to make an immediate charge. Select 'Authorize Only' to authorize the card and then manually settle the funds at a later time (such as during shipping).
- Title- Select a title for this Payment Option such as 'Secure Credit Card' or 'Newtek Gateway'.
- Source Key- Please enter your USA ePay Source Key. Input your source key generated from your Newtek Gateway merchant console
- Source PIN- Enter a pin, if applicable.
- Transaction Description- Enter a description that will appear on all transactions or use #[orderid] to display the order ID.
- Accepted Currency- Unless you have a Multi-Currency gateway account this is always US Dollars.
- New Order Status- Select the status that will appear on all new orders.
- Use Sandbox- Select "No" to send transactions to your main Newtek Gateway account. Select "Yes" to send transactions to a "sandbox" test environment.
- Sort Order- If you have multiple payment options enter 1 to have this payment module be first.
- Payment from applicable countries- If you accept payments from all countries select this option or select Specific and the next section will be active.
- Payment from specific countries- Select specific countries to accept payment from.
- Minimum Order Total- Enter the dollar amount for a minimum order.
- Maximum Order Total- Enter the dollar amount for a maximum order.
- Checkout page-
osCommerce
Version: 2.0.0 (6/23/2009) This module has been tested on osCommerce v2.2 RC 2a.
Downloads:
Installation
To install the module, download one of the above files and extract the contents. You should end up with two files:
- includes/modules/payment/newtek.php
- includes/languages/english/modules/payment/newtek.php
Upload each of these files to its corresponding osCommerce catalog directory on your website. If the files are uploaded correctly you will see Newtek Gateway listed under the payment modules menu (see below). For assistance uploading files please consult your web hosting provider.
Tutorial
Step 1
Using your favorite web browser, pull up the administration page of your osCommerce shopping cart. It will look something like the image below:
Step 2
In the "Modules" area click on "Payment" and you will be brought to your payment modules area:
Step 3
Toward the bottom of the page you will see Newtek Gateway. Click the name and the page will change
Step 4
Click the "Edit" button to input your Newtek Gateway gateway account information
Module Values and Descriptions
- Enable Newtek Gateway Module Do you want to accept Newtek Gateway payments?
- This is the main enable switch, select "True" to activate payment module
- Source Key The source key created in Newtek Gateway console:
- Enter the source key generated from your merchant console at Newtek Gateway.com
- Source Pin The source pin used to create verify transaction authenticity (must match pin setup in console):
- Enter the exact PIN that is in the source editor of your Newtek Gateway Merchant Console
- Transaction Mode Transaction mode used for processing orders
- Select "Test" in order to simulate a transaction without actually processing the card. All fraud and verification checks are performed. Select "Production" to run live transactions
- Transaction Method Transaction method used for processing orders
- Select "Credit Card" to process Credit Card transactions or Select "eCheck" to process electronic check transactions (ACH)
- Queue Transaction Should transactions be queued for your review at Newtek Gateway?
- Select "True" if you want to authorize credit cards not charge them immediately and see the charges in the queued transactions list of your Newtek Gateway Merchant Console. Select "False" for your charges to be immediate and appear in the "Batches" area of your Newtek Gateway merchant console.
- Credit Card Collection Should the credit card details be collected locally or remotely use the Newtek Gateway Payment Form?
- Select "PayForm" for Newtek Gateway
- Customer Notifications Should Newtek Gateway e-mail a receipt to the customer?
- Select "True" to send receipts or "False" to let your osCommerce shopping cart be the only one to send the receipt
- Payment Zone If a zone is selected, only enable this payment method for that zone.
- Please consult your osCommerce documentation or leave as "none"
- Set Order Status Set the status of orders made with this payment module to this value
- Delivered - This status tells the customer that the item has been delivered
- Pending - This status tells the customer that the item they purchased is pending
- Processed - This status tells the customer that the transaction has been processed
- Sort order of display Lowest is displayed first.
- If you have more than one payment processor setup this is where you can change the order of what the customer sees on the website
Click "Update" to save the values
Step 4
Add a product to your cart to see if the Newtek Gateway payment module is in place. Don't forget to turn off test mode in the merchant console's source editor if running a live transaction.
SearchFit
Tutorial
Step 1
Open your web browser and go to your SearchFit Admin screen. The URL will be provided to you by SearchFit. It will be in the format of http://www.domain.com/scart/public/admin where "domain" is replaced with your domain.
Step 2
Click on the "Settings" tab.
Step 3
Select the option "Credit Card Processors" under "Payment Settings".
Choose "newtekgateway.com" as your selected processor.
Processor Settings

- Gateway URL - Enter "https://sandbox.newtekgateway.com/gate" if you are using the sandbox server to test your cart. You must have a sandbox account in order to run transactions on the sandbox. The address for the live server is "https://secure.newtekgateway.com/gate". Use this once any testing has been completed and you wish to accept live transactions.
- Source Key - Put your source key here.
- Source Pin (optional) - If you are using a pin, put it here.
- Currency - Leave this as USD unless you are signed up to process in multiple currencies.
- Transaction Type - Set this to "Authorize and Capture" to have your transactions immediately captured and put into your batch. "Authorize Only" will send transactions to your queue.
- Transaction Mode - "Normal Operation" will run your transactions normally. Use this if you are running tests on the sandbox server or if you are capturing live transactions on the live server. "Test Mode" will function just like "Test Mode" on your source key, so transaction details will not be created and "TESTMD" will be returned as the authorization code. Remember, we always recommend that you conduct tests on the sandbox environment we have provided.
- Payment Name - This should be left blank unless you are working with multiple gateways.
- Submit Amounts - This should be left as "Selected Currency" unless otherwise instructed.
Once all settings have been adjusted, click "Update" to save your changes.
Volusion 11
Your store needs to communicate with Newtek Gateway and the gateway communicates with your merchant account bank. Therefore your store software only needs to know the connection settings for your gateway.
Tutorial
Step 1
Navigate to Settings —> Payment in the home page of your admin area.
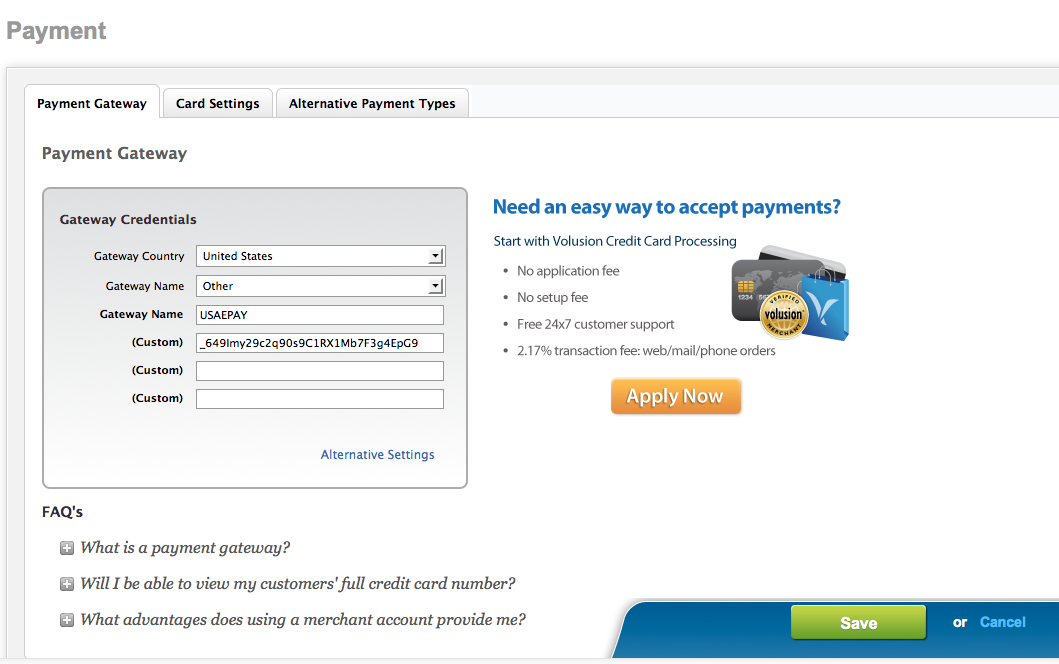
- Gateway Name: - Drop down the menu and select Other
- Gateway Name2: - Enter : USAEPAY
- Custom: - Enter your source key from the Newtek Gateway Merchant Console. It's a 32 character alphanumeric passphrase that is generated by you the Merchant. DO NOT enter your login name for Newtek Gateway OR your Newtek Gateway password. This will not work.
- Custom2: -Leave Blank
- Custom3: -Leave Blank
Step 2
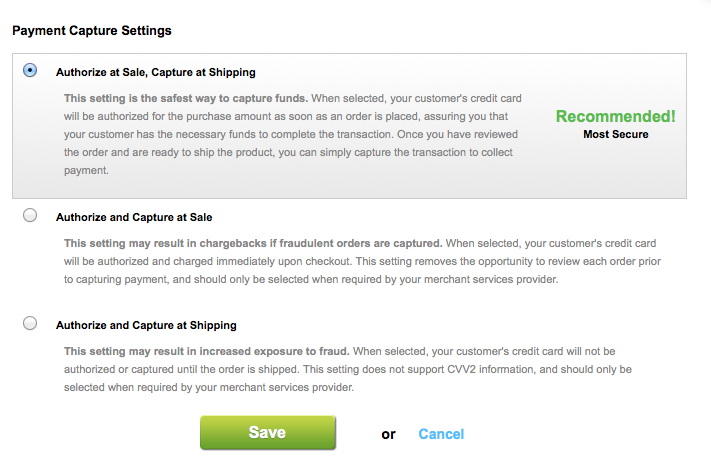
Payment Capture Settings: Select "Alternative Settings"
- If you select Authorize and Capture at Sale this will process the charge immediately and you should see your transactions in the Batches area of your Newtek Gateway Merchant console.
- If you select Authorize at Sale, Capture at Shipping this will authorize your customer's credit card and you should see the transactions in the Queued Transactions area of the Batch Manager in your Newtek Gateway Merchant console. You will need to capture the funds manually in order to settle the transaction.
- If you select Authorize and Capture at Shipping this process will not contact the gateway and you will have to manually process the transaction through the vTerminal of your Newtek Gateway Merchant console. This is NOT recommended.
Step 3
Save the settings you just entered.
Please Note: - Volusion currently does not support Newtek Gateway as a check process as of now. Newtek Gateway is capable if processing checks for a merchant as well. - Volusion does not support a PIN at the moment, only the source key can be used.
Step 4
Save the settings you just entered.
Step 5
Next, place a test order on your website for a product. After checking out and processing you should be able to see your transaction in Newtek Gateway's Merchant console under Batches or Queued Transactions, depending on the Authorization Mode that was chosen.
Step 6
When you are ready to make the module live, make sure your source key is not in test mode, otherwise it will not be reflected in the Batch Manager.
Wordpress eCommerce
This page provides a guide for downloading and installing a Newtek Gateway payment module for WP e-Commerce. This module has been tested on WP e-Commerce 3.8.12.1 .
Tutorial
Step 1
Download the Newtek Gateway WP file and drop it inside your website folder.
Step 2
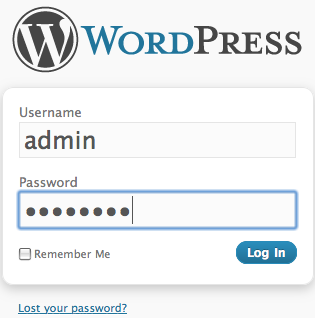
Item Open your web browser and go to your WordPress Admin screen and login. The URL will be provided to you by WordPress.
Step 3
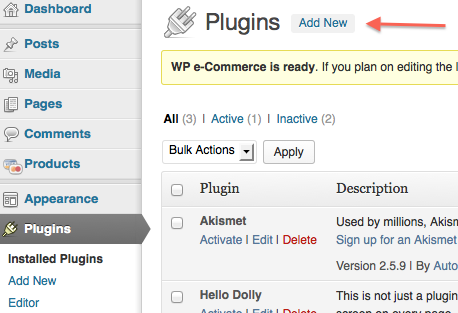
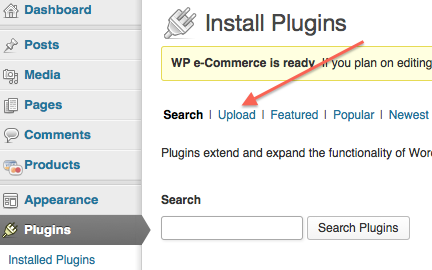
Item In the Dashboard toolbar on the left, click on Plugins. Then click on Add New toward the top.
Step 4
Now click on Upload section.
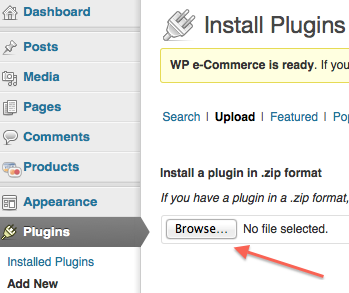
Step 5
Click on Browse and select Newtek Gateway module that you downloaded previously and then click Install Now.
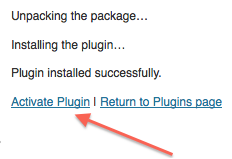
Step 6
After plugin has been installed click on Activate Plugin.
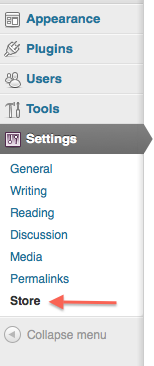
Step 7
Then go to the Settings section and click on Store.
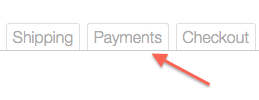
Step 8
Select Payments section on the top menu.
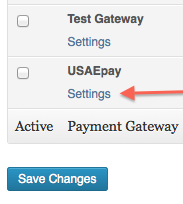
Step 9
Click on Settings for Newtek Gateway plugin.
Step 10
Plug in your source key and pin from your merchant account and configure the rest of the settings.After you done click on Save Changes. Now you can start using your WP Ecommerce with Newtek Gateway.
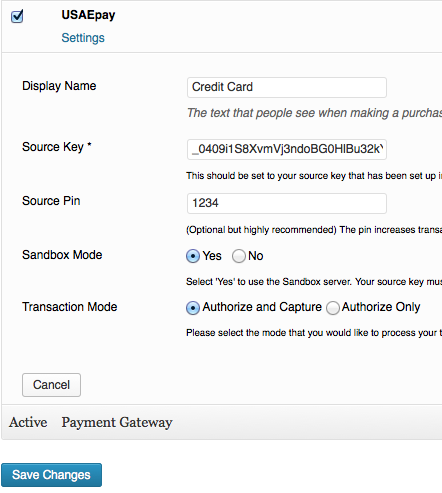
Gateway Settings
- Source Key - Put your source key here.
- Source Pin - (Optional but highly recommended) The pin increases transaction security and greatly reduces fraud. This pin must match the pin entered in the Newtek Gateway interface when setting up the source key..
- Sandbox Mode - Select 'Yes' to use the Sandbox server. Your source key must be created on a sandbox account.
- Transaction Mode - Please select the mode that you would like to process your transaction in. "Authorization Only" will hold funds from your customers credit card and will place the transaction in your Queued Transactions screen. "Authorize and Capture" will also hold funds but will place the transaction into your batch, ready for settlement.
Once all settings have been adjusted, click "Update" to save your changes.
Zen Cart
Zen Cart Payment Module Tutorial
Before starting this tutorial, please ensure that you have the most current version of the Newtek Gateway Zen Cart uploaded to your Zen Cart payment modules directory.
- Our current version is: 2.0
- Last Updated: 05/27/2009
Step 1
Using your favorite web browser, pull up the administration page of your Zen Cart shopping cart. It will look something like the image below:
Step 2
Point your cursor to the link titled "Modules" and click on "Payment":
Step 3
At the bottom of the "Payment Modules" list click on Newtek Gateway. The payment module should appear on the right side of the screen. If you do not see it, double-check to make sure that the files were uploaded correctly.
Step 4
Click on the "Edit" button:
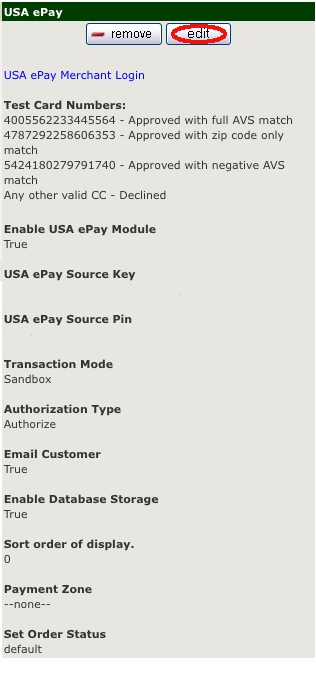
Module Setup
- Enable USA ePay Module Do you want to accept USA ePay credit card payments?
- Select "True"
- USA ePay Source Key Please enter your USA ePay Source Key
- Input your [[http://wiki.newtekgateway.com/merchant/console/sources|source key]] generated from your Newtek Gateway merchant console
- USA ePay Source PIN Enter a pin, if applicable
- Transaction Mode Transaction mode used for processing orders
- Select "Production" if you generated your key on the production server (secure.newtekgateway.com or secure.newtekgateway.com). Select "Sandbox" if you generated your key on the sandbox server (sandbox.newtekgateway.com). Keep in mind that if you use a sandbox key in Production mode, or vice versa, you will receive an error that says "Specified Source Key not found."
- Authorization Type Do you want submitted credit card transactions to be authorized only, or immediately charge?
- Select “Authorize” if you want to authorize credit cards not charge them immediately and see the charges in the queued transactions list of your USA ePay Merchant Console. Select “Immediate Charge” for your charges to be immediate and appear in the “Batches” area of your USA ePay merchant console.
- Email Customer Do you want USA ePay to email the customer a copy of the order?
- Select "True" or "False" based on your preference
- Enable Database Storage Do you want to save the gateway data to the database? (Note: You must add a table first)
- Select "True"
- Sort order of display. Sort order of display. Lowest is displayed first.
- Type 0 in the text box
- Payment Zone If a zone is selected, only enable this payment method for that zone.
- Select None
- Set Order Status Set the status of orders made with this payment module to this value
- Select the appropriate status you want displayed for orders coming through the module.
Step 5
Click "Update" to save your changes. Log out of admin, or pull up another tab, and enter your store to purchase a product. Select a product that is small in price and purchase it. When you receive a confirmation from your cart that the order was successful, log into your Newtek Gateway account and view your batch to ensure that the order came in successfully.
Troubleshooting
GoDaddy Proxy Issues
Proxy servers are not required for outbound shared hosting connections as of September 10, 2008. In case of the connection problems, make sure that you have the following settings:
Go to Admin->Configuration->My Store
cURL Proxy Status - FALSE
Error reading from card processing gateway. - Your card has been declined
Go to /includes/modules/payment/newtek_api.php, line 818 and add
$this->ignoresslcerterrors=true
If the above step works, then it means your server is not setup correctly to validate SSL certificates. Please contact support for assistance. You do not want to leave the above setting in place for production use.
PHP Fatal error: Call to a member function add_session() on a non-object in includes/modules/payment/newtek_api.php
Go to /includes/modules/payment/newtek_api.php Find the following:
function pre_confirmation_check() {
and make is this:
function pre_confirmation_check() {
global $messageStack;