Transactions
Sale
Swiped
The Sale window allows the merchant to process credit card transactions and DOES require a magnetic strip card reader. By swiping the credit card, you are attaining the best possible transaction rate.
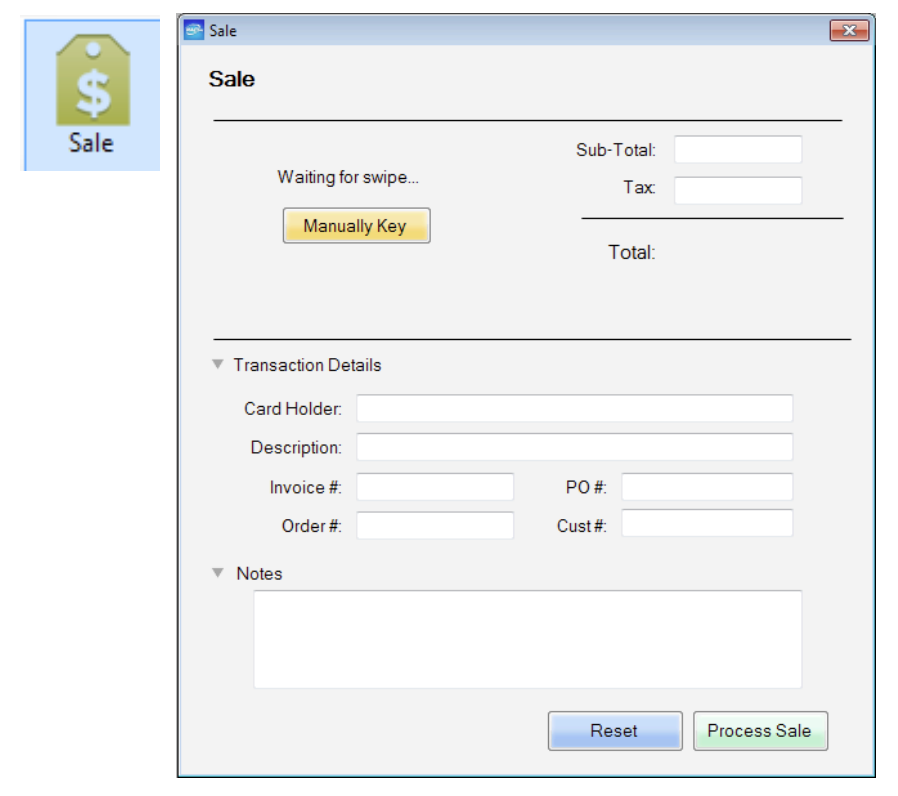
Step 1
If the Sale Window is not already open, click on the “Sale Icon” or from the menu, select Transactions -> Sale.
Step 2
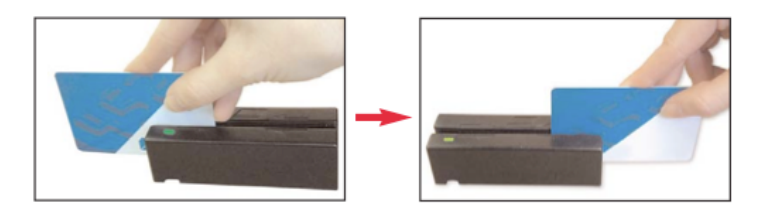
Within the Sale window, a “Waiting for swipe…” text will be displayed. At this time, swipe the credit card through the magnetic reader. The magnetic strip on the credit card should be facing towards the power light on the USB reader.
Make sure the card is flat on the reader base and swipe steadily. The card reader should also be on a flat and level surface for the best performance.
Step 3
When properly swiped, the Cardholder, Card Number and Expiration will be automatically filled in. Enter the Sub-Total (amount to be charged) and all other fields as needed.
The fields for CVV2, Street and Zip will be grayed out, as that information does not need to be entered for a swiped transaction.
Step 4
Click the “Process Sale” button to process the current transaction.
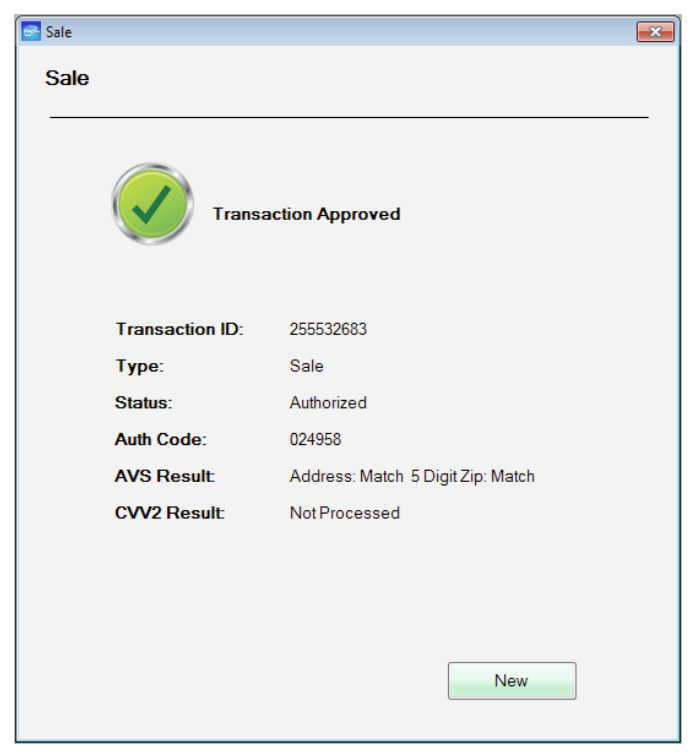
Approved Transactions
A “Transaction Approved” window will be displayed for all approved transactions. Processor results will be displayed. To email a customer receipt, press the “Email Receipt” button and enter the customer email address. To view or print a transaction receipt, click the “Print Receipt” button. To process a new transaction, click the “New” button.
Declined Transactions
If for any reason a transaction has been declined, a Transaction Declined window will be displayed with a decline reason.
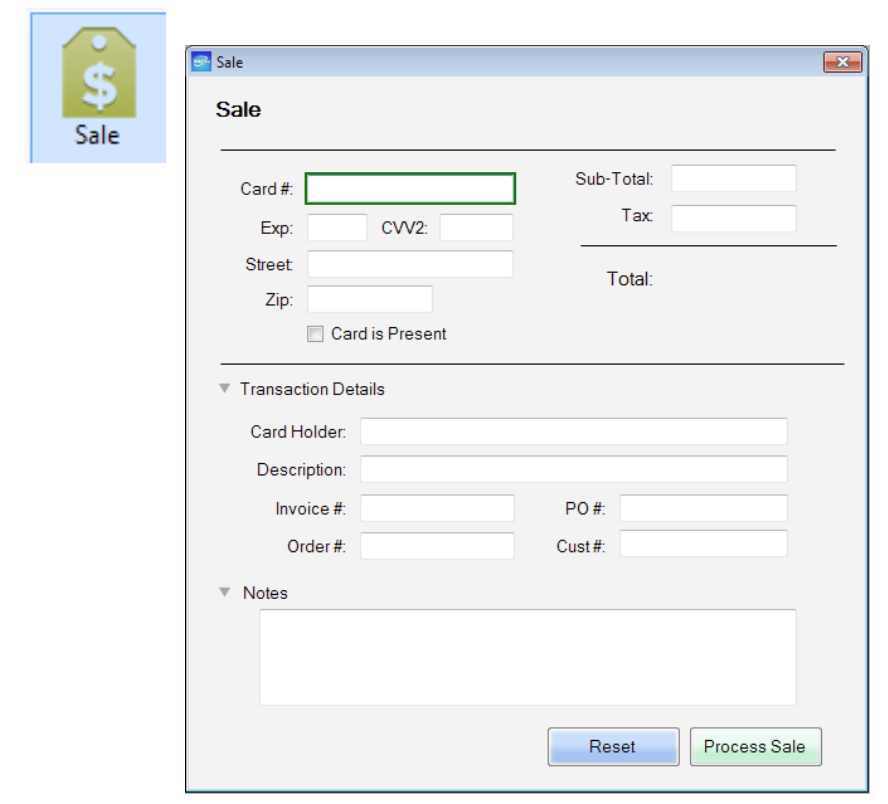
Manual
A Manually Keyed transaction is very similar in process as a swiped transaction except that a mag. reader in NOT required. The credit card information is manually keyed into the Retail Software. By keying in the transaction, a higher processing rate me be incurred.
Step 1
If the Sale Window is not already open, click on the “Sale Icon” or from the menu, select Transactions -> Sale.
Step 2
Within the Sale window, the screen will default to a manual entry.
Step 3
Enter the customer information and click the “Process Sale” button to process the current transaction.
*Card Number, Expiration and Sub-Total (charge amount) are the only fields required in order to charge a card. All other fields are for your company records.
Approved Transactions
A “Transaction Approved” window will be displayed for all approved transactions. Processor results will be displayed. To email a customer receipt, press the “Email Receipt” button and enter the customer email address. To view or print a transaction receipt, click the “Print Receipt” button. To process a new transaction, click the “New” button.
Declined Transactions
If for any reason a transaction has been declined, a Transaction Declined window will be displayed with a decline reason.
To view previous transaction and for receipt reprint, refer to your reports.
AuthOnly
Swiped
The Auth Only window allows the merchant to pre-authorize and DOES require a magnetic strip reader. Pre-authorizing the transaction places the transaction into the Queued Transactions (refer to the Merchant Console User Guide) instead of the Batch Manager.
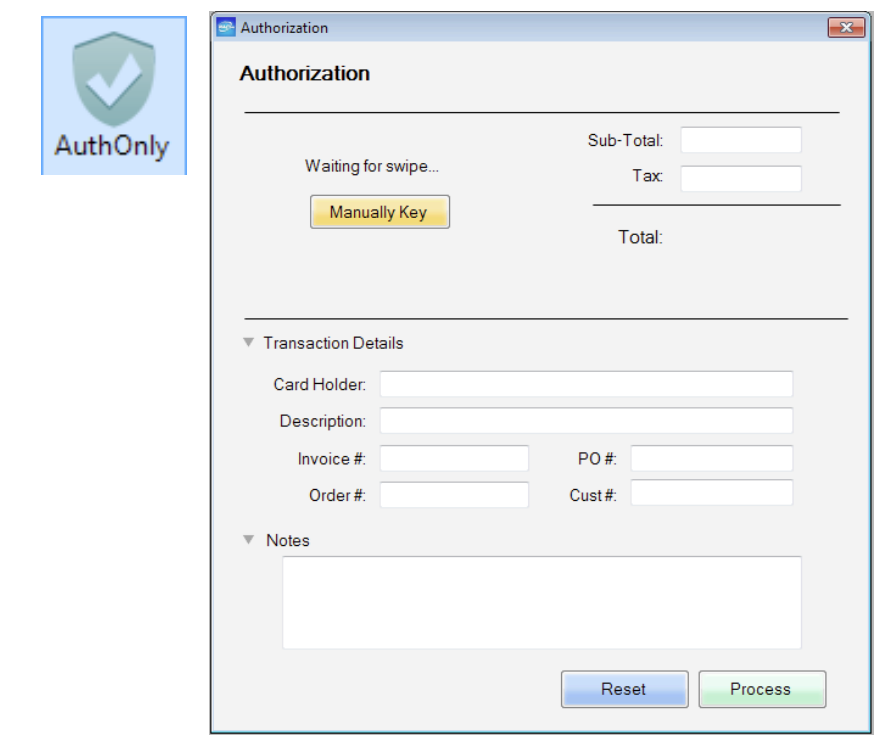
Step 1
Click on the “AuthOnly Icon” or from the menu, select Transactions -> AuthOnly.
Step 2
Within the AuthOnly window, a “Waiting for swipe…” text will be displayed. At this time, swipe the credit card through the magnetic reader. The magnetic strip on the credit card should be facing towards the power light on the USB reader.
Make sure the card is flat on the reader base and swipe steadily. The card reader should also be on a flat and level surface for the best performance.
Step 3
When properly swiped, the Cardholder, Card Number and Expiration will be automatically filled in. Enter the Sub-Total (amount to be charged) and all other fields as needed.
The fields for CVV2, Street and Zip will be grayed out, as that information does not need to be entered for a swiped transaction.
Step 4
Click the “Process” button to process the current transaction.
Manual
The Auth Only window allows the merchant to pre-authorize and DOES NOT require a magnetic strip reader. Pre-authorizing the transaction places the transaction into the Queued Transactions (refer to the Merchant Console User Guide) instead of the Batch Manager.
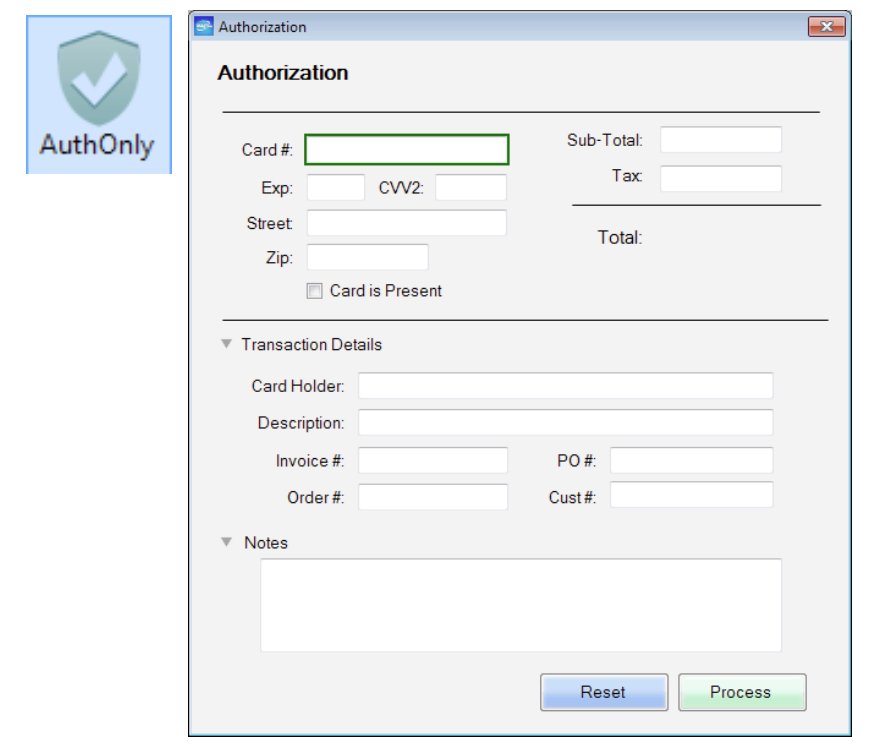
Step 1
If the Sale Window is not already open, click on the “AuthOnly Icon” or from the menu, select Transactions -> AuthOnly.
Step 2
Within the AuthOnly window, click the “Manually Key” button. If there is no swiper assigned in your device manager, the screen will default to a manual entry.
Step 3
Enter the customer information and click the “Process” button to process the current transaction.
Card Number, Expiration and Sub-Total (charge amount) are the only fields required in order to charge a card. All other fields are for your company records.
Approved Transactions
A “Transaction Approved” window will be displayed for all approved transactions. Processor results will be displayed. To email a customer receipt, press the “Email Receipt” button and enter the customer email address. To view or print a transaction receipt, click the “Print Receipt” button. To process a new transaction, click the “New” button.
Declined Transactions
If for any reason a transaction has been declined, a Transaction Declined window will be displayed with a decline reason.
Credit (Refund)
Swiped
The Credit window allows the merchant to credit a transaction and DOES require a magnetic strip card reader. By swiping the credit card, you are attaining the best possible transaction rate.
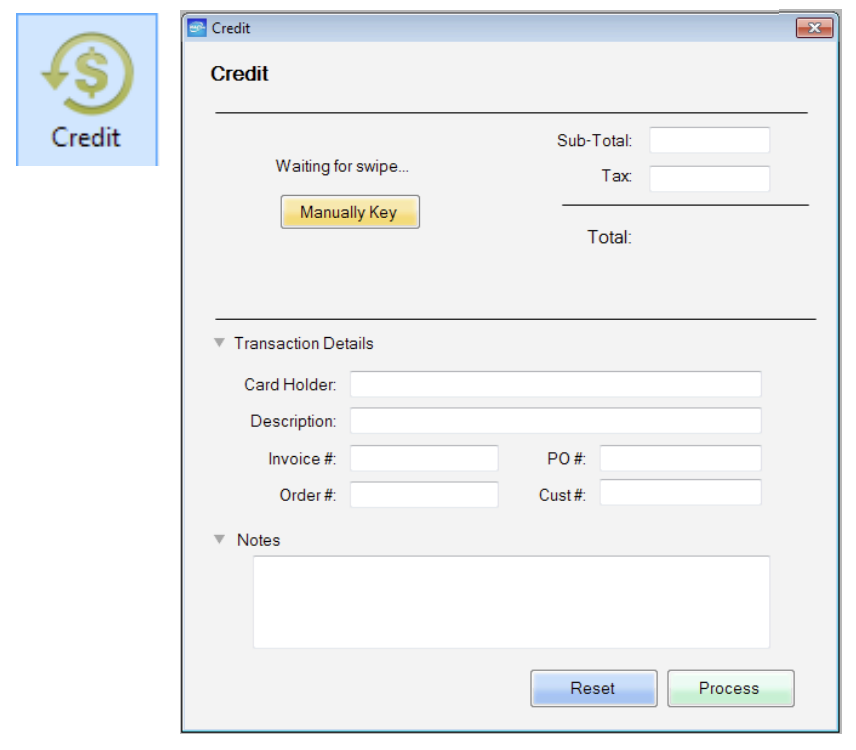
Step 1
Click on the “Credit Icon” or from the menu, select Transactions -> Credit.
Step 2
Within the Credit window, a “Waiting for swipe…” text will be displayed. At this time, swipe the credit card through the magnetic reader. The magnetic strip on the credit card should be facing towards the power light on the USB reader.
Make sure the card is flat on the reader base and swipe steadily. The card reader should also be on a flat and level surface for the best performance.
Step 3
Enter the customer information and click the “Process” button to process the current transaction.
Card Number, Expiration and Sub-Total (charge amount) are the only fields required in order to charge a card. All other fields are for your company records.
To view previous transaction and for receipt reprint, refer to your reports.
Manual
A manually keyed Credit transaction is very similar in process as the swiped transaction except that a mag. reader is NOT required. The credit card information is manually keyed into the Retail Software. By keying in the transaction, a higher processing rate may be incurred.
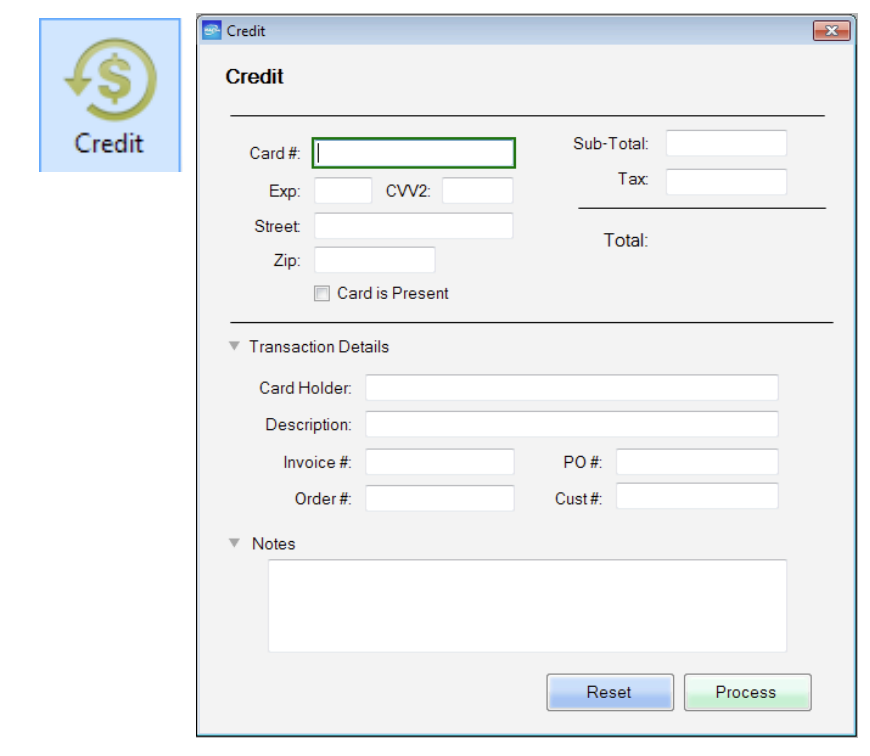
Step 1
Click on the “Credit Icon” or from the menu, select Transactions -> Credit.
Step 2
Within the Credit window, click the “Manually Key” button. If there is no swiper assigned in your device manager, the screen will default to a manual entry.
Step 3
Enter the customer information and click the “Process” button to process the current transaction.
Card Number, Expiration and Sub-Total (charge amount) are the only fields required in order to charge a card. All other fields are for your company records.
Approved Transactions
A “Transaction Approved” window will be displayed for all approved transactions. Processor results will be displayed. To email a customer receipt, press the “Email Receipt” button and enter the customer email address. To view or print a transaction receipt, click the “Print Receipt” button. To process a new transaction, click the “New” button.
Declined Transactions
If for any reason a transaction has been declined, a Transaction Declined window will be displayed with a decline reason.
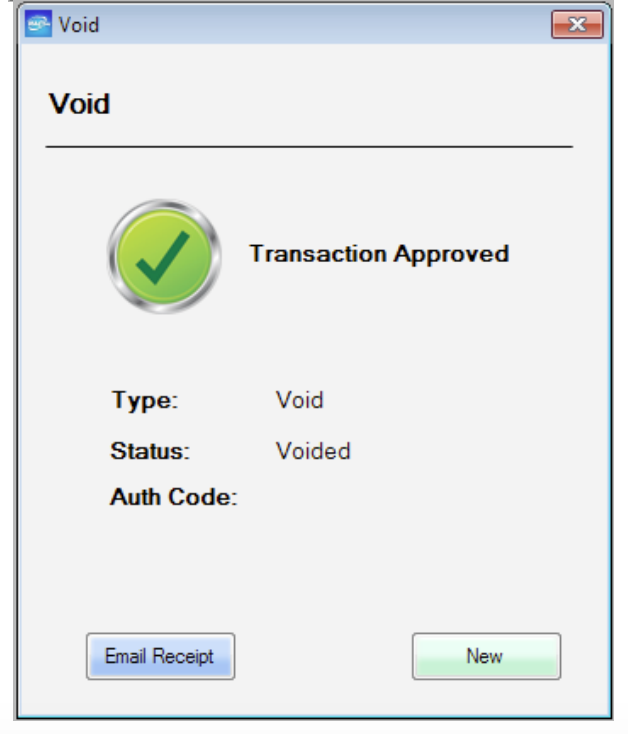
Void
The Void window allows the merchant to cancel a previously authorized transaction as long as the transaction being voided is within an open batch. Void DOES NOT require a magnetic strip card reader.

Step 1
Click on the “Void Icon” or from the menu, select Transactions -> Void.
Step 2
Within the Void window, enter customer information and click the “Process Void” button to process the void for the current transaction.
Reference number can also be referred to as a Transaction ID. You can only do a void for the full amount for the previously authorized transaction, partial voids are not permitted.
Approved Transactions
A “Transaction Approved” window will be displayed for all approved transactions. Processor results will be displayed. To email a customer receipt, press the “Email Receipt” button and enter the customer email address. To view or print a transaction receipt, click the “Print Receipt” button. To process a new transaction, click the “New” button.
Declined Transactions
If for any reason a transaction has been declined, a Transaction Declined window will be displayed with a decline reason.
Post Authorization
The PostAuth window allows the merchant to post a previously authorized transaction (AuthOnly) and DOES NOT require a magnetic strip card reader. You can choose to swipe the card if you desire.
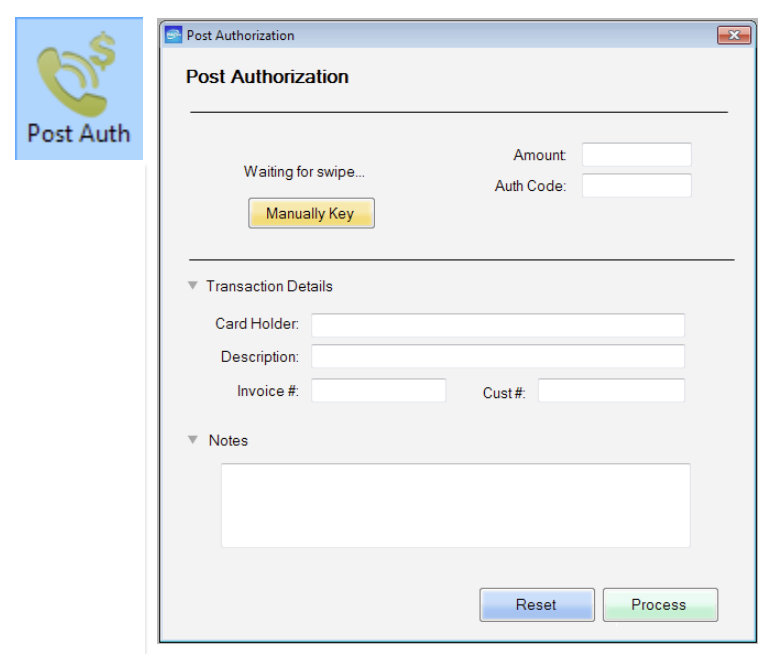
Step 1
Click on the “PostAuth Icon” or from the menu, select Transactions -> PostAuth.
Step 2
Within the PostAuth window, a “Waiting for swipe…” text will be displayed. At this time, swipe the credit card through the magnetic reader. The magnetic strip on the credit card should be facing towards the power light on the USB reader.
You can enter the Credit Card and Expiration manually by pressing the “Manually Key” button.
Make sure the card is flat on the reader base and swipe steadily. The card reader should also be on a flat and level surface for the best performance.
Step 3
Enter the Authorized Amount and Authorization Code and click the “Process” button to process the current transaction.
Card Number, Expiration, Authorization Code and Sub-Total (charge amount) are the only fields required in order to charge a card. All other fields are for your company records.
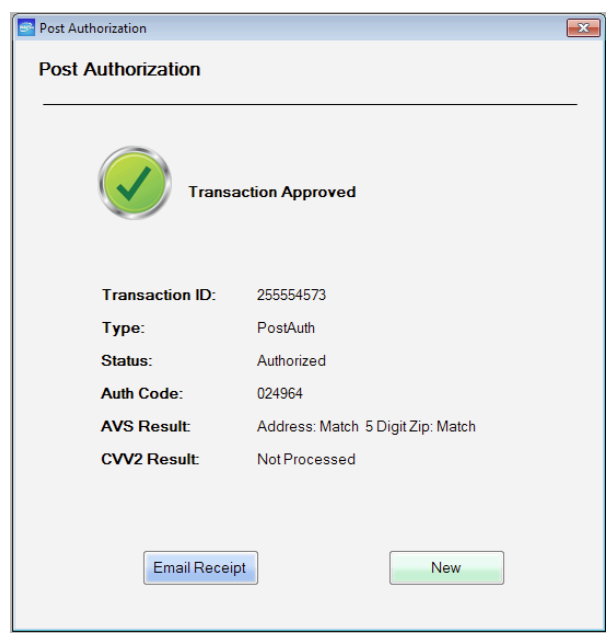
Approved Transactions
A “Transaction Approved” window will be displayed for all approved transactions. Processor results will be displayed. To email a customer receipt, press the “Email Receipt” button and enter the customer email address. To view or print a transaction receipt, click the “Print Receipt” button. To process a new transaction, click the “New” button.
Declined Transactions
If for any reason a transaction has been declined, a Transaction Declined window will be displayed with a decline reason. If you receive a Decline for a previously authorized transaction, you will need to call the voice authentication line for the credit card and obtain a new authorization.
Capture
The Capture window allows the merchant to move previously authorized transactions from the Queued Transaction to the batch manager. Capture DOES NOT require a magnetic strip card reader. Refer to the Merchant Console Guide for Queued Transaction information.
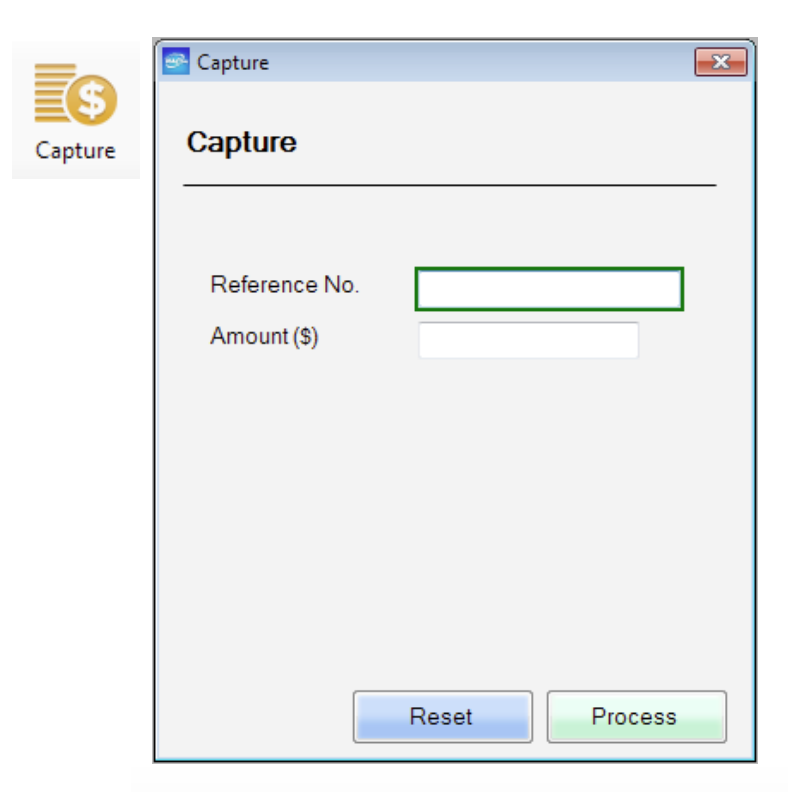
Step 1
Click on the “Capture Icon” or from the menu, select Transactions -> Capture.
Step 2
Within the Capture window, enter customer information and click the “Process” button to process the void for the current transaction. You can only capture an Authorized Only transaction.
Reference number can also be referred to as a Transaction ID. You can only capture up to the total amount that was previously authorized.
Check (ACH)
The Check window allows the merchant to process checks directly through the Retail ePay Charge software and DOES NOT require a magnetic strip card reader. A Check Transaction does not require a credit card but a valid routing and account number form where the funds are to be drafted from. A Check processing account must be established to process checks.
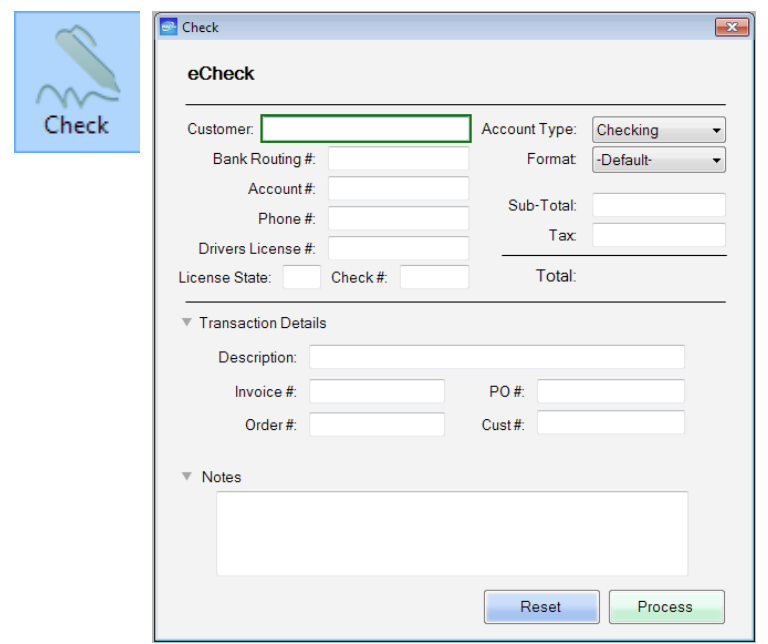
Step 1
Click on the “Check Icon” or from the menu, select Transactions -> Check.
Step 2
Within the Check window, enter the customer information and click the “Process” button to process the current transaction.
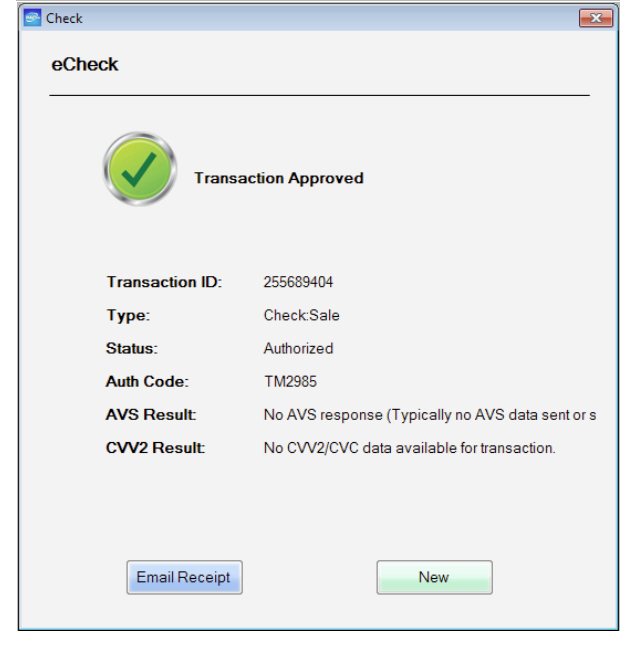
Approved Transactions
A “Transaction Approved” window will be displayed for all approved transactions.
Processor results will be displayed. To email a customer receipt, press the “Email Receipt” button and enter the customer email address. To view or print a transaction receipt, click the “Print Receipt” button. To process a new transaction, click the “New” button.
Declined Transactions
If for any reason a transaction has been declined, a Transaction Declined window will be displayed with a decline reason.