Required Fields
This code will allow you to use Javascript to make fields required. The customer will be alerted that they must fill out certain fields before they are able to submit information to the gateway.
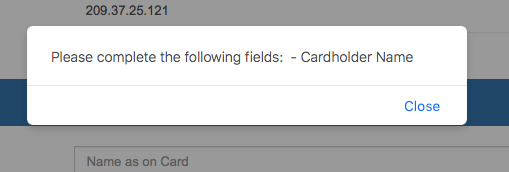
Required Fields Alert Box
The example below shows only one required field (Cardholder Name/UMname). Remember to replace UMname with the field you would like to require and Cardholder Name with the customer facing field name for the error message.
Javascript
Locate this section:
<script type="text/javascript">
     var submitted = false;
     function submitform()
     {
       if(submitted) {
         return false;
       }
       submitted=true;
       document.epayform.submitbutton.value='Please Wait... Processing';
       return true;
     }
</script>
Insert a new line directly below and add the following code (with your alterations):
<script type="text/javascript">
function verify()
{
var themessage = "Please complete the following fields: ";
if (document.epayform.UMname.value=="") {
themessage = themessage + " - Cardholder Name";
}
if (themessage == "Please complete the following fields: ") {
document.epayform.submit();
return true;
}
else {
alert(themessage);
return false;
 }
}
</script
You can make as many fields required as you want. To make a field required, repeat this section of code (remember to replace UMfield with the required field and Name of Field with the customer facing field name):
if (document.epayform.UMfield.value=="") {
themessage = themessage + " - Name Of Field";
}
Multi-field Verification
Add this function for when you are using multiple fields with the same ID (ex, UMname). This will be useful for a payment form that gives the customer an option of paying with two different payment methods: credit card or check. This way each section can have its own UMname field.
<script type="text/javascript">
       function multiverify(element){
         var elementlength = element.length;
         var valid = 0;
         for (var i = 0; i < elementlength; i++) {
           var value = element[i].value;
           if(value ==""&& valid < 1){
             return false;
           }
           else {
             valid ++;
             return true;
           }
         }
        if(valid <= 0){
          return false;
         }
       }
</script>
For every multi-field you want to use, repeat this section of code (remember to replace UMfield with the required field and Name of Field with the customer facing field name):
if(multiverify(document.epayform.UMfield) != true){
    themessage = themessage + " - Name of Field";
  }
HTML
Scroll down to the bottom of the form and look for this line:
<form name="epayform" action="[UMformURL]" method="POST" autocomplete="off" onSubmit="return submitform()">
Replace it with:
<form name="epayform" action="[UMformURL]" method="POST" autocomplete="off" onSubmit="return verify()">
Once you have saved, a alert box like the one below will appear if a customer tries to submit a form without entering required fields:
IMPORTANT: Remember to include the field in the form, if it is required. If you do not give the customer the option to submit the required field, then they will not be able to submit the form. For example, if you have the UMinvoice in the hidden fields you will find the line:
<input type="hidden" name="UMinvoice" value="[UMinvoice]">
To make the field available, delete the line above, and add the below section to to body of the form:
<div class="form-group">
  <span class="col-form-label col-sm-4 col-xs-12 ">Invoice Number</span>
  <div class="col-md-8 col-xs-12 ">
    <input id="UMinvoice" name="UMinvoice" class="form-control" type="text"  placeholder="Invoice Number" value="[UMinvoice]">
  </div>
</div>
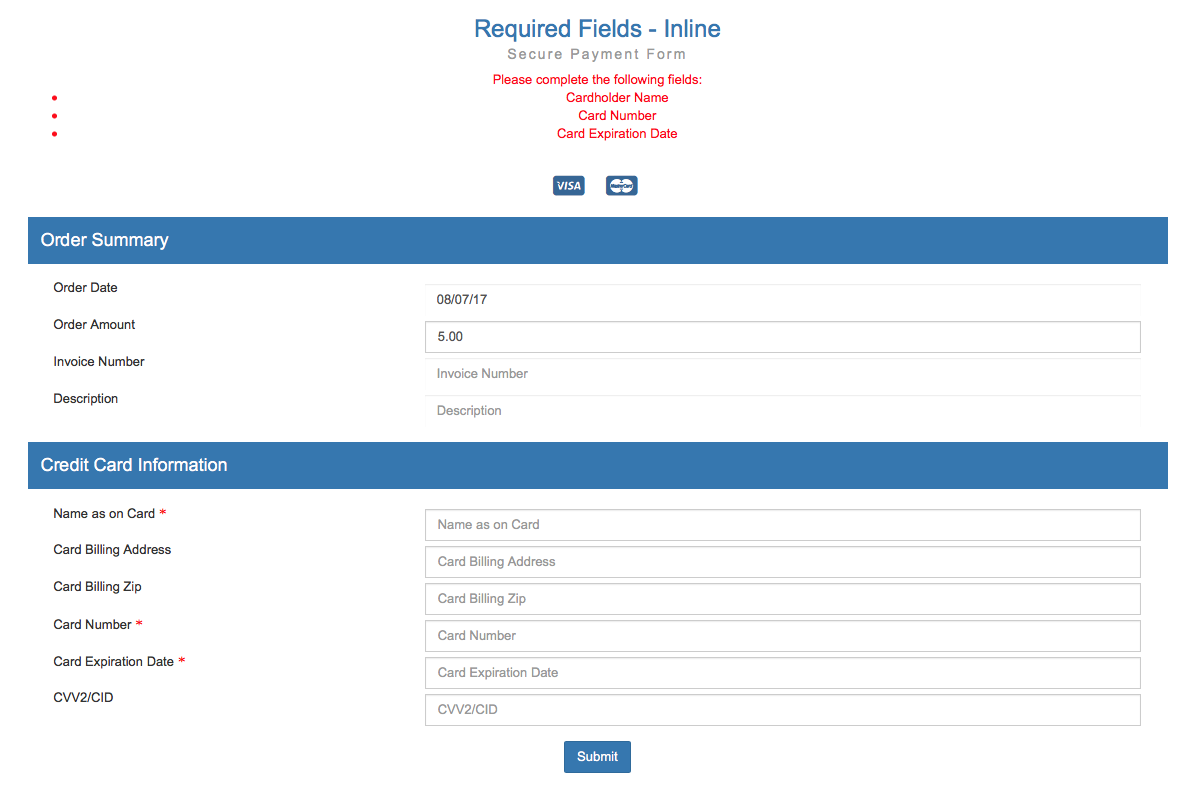
Inline Required Fields
This code uses Javascript to make fields required. It is similar to the script above, except that it indicates which fields are required when the customer lands on the payment form and after the script validates the form, it provides inline instructions for the customer as opposed to instructions in an alert box.
Javascript
The example below shows the required fields (Cardholder Name/UMname, Card Number/UMcard, and Card Expiration Date UMexpir). Remember to replace UMfields with the field you would like to require and the customer facing field name (like Cardholder Name) with the fields you would like to require.
Locate this section:
<script type="text/javascript">
     var submitted = false;
     function submitform()
     {
       if(submitted) {
         return false;
       }
       submitted=true;
       document.epayform.submitbutton.value='Please Wait... Processing';
       return true;
     }
</script>
Insert a new line directly below and add the following code (with your alterations):
<script type="text/javascript">
function verify()
{
  var themessage = "Please complete the following fields: ";
  themessage = themessage + "<ul>";
  if (document.epayform.UMname.value=="") {
    themessage = themessage + "<li>Cardholder Name</li>";
  }
  if (document.epayform.UMcard.value=="") {
    themessage = themessage + "<li> Card Number</li>";
  }
  if (document.epayform.UMexpir.value=="") {
    themessage = themessage + "<li> Card Expiration Date</li>";
  }
  themessage = themessage + "</ul>";
  //alert if fields are empty and cancel form submit
  if (themessage == "Please complete the following fields: <ul></ul>") {
    document.epayform.submit();
    return true;
  }
  else {
    document.getElementById('required').innerHTML = "<font color=\"#FF0000\">" + themessage + "</font>";
    window.scrollTo(0,0);
    return false;
  }
}
</script>
You can make as many fields required as you want. To make a field required, repeat this section of code (remember to replace UMfield with the required field and Name of Field with the customer facing field name):
if (document.epayform.UMfield.value=="") {
themessage = themessage + "<li> Name of Field</li>";
}
Multi-field Verification
Add this function for when you are using multiple fields with the same ID (ex, UMname). This will be useful for a payment form that gives the customer an option of paying with two different payment methods: credit card or check. This way each section can have its own UMname field.
<script type="text/javascript">
       function multiverify(element){
         var elementlength = element.length;
         var valid = 0;
         for (var i = 0; i < elementlength; i++) {
           var value = element[i].value;
           if(value ==""&& valid < 1){
             return false;
           }
           else {
             valid ++;
             return true;
           }
         }
        if(valid <= 0){
          return false;
         }
       }
</script>
For every multi-field you want to use, repeat this section of code (remember to replace UMfield with the required field and Name of Field with the customer facing field name):
if(multiverify(document.epayform.UMfield) != true){
    themessage = themessage + "<li>Name of Field</li>";
  }
HTML
Create inline instructions. First find:
<h2 class="sub-title text-muted">Secure Payment Form
</h2>
Create a new line directly below and add:
<div id="required">
  <h6>
    <div id="required">
      <font size="2" face="Verdana" color="#ff0000">*
      </font>
      <font size="2" face="Verdana"> indicates a required field.
      </font>
    </div>
  </h6>
</div>
</div>
Create red *'s for each required field.
For `UMname' find:
<div class="form-group">
  <span class="col-form-label col-sm-4 col-xs-12 ">Name as on Card</span>
  <div class="col-md-8 col-xs-12 ">
    <input id="UMname" name="UMname" class="form-control" type="text" placeholder="Name as on Card" value="[UMname]">
  </div>
</div>
Replace it with:
<div class="form-group">
  <span class="col-form-label col-sm-4 col-xs-12 ">Name as on Card <font face="Verdana" size="2"color="#ff0000">*
    </font></span>
  <div class="col-md-8 col-xs-12 ">
    <input id="UMname" name="UMname" class="form-control" type="text" placeholder="Name as on Card" value="[UMname]">
  </div>
</div>
For UMcard and UMexpir find:
<div class="form-group">
  <span class="col-form-label col-sm-4 col-xs-12 ">Card Number</span>
  <div class="col-md-8 col-xs-12 ">
    <input id="UMcard" name="UMcard" class="form-control" type="text" placeholder="Card Number" value="[UMcard]">
  </div>
</div>
<div class="form-group">
  <span class="col-form-label col-sm-4 col-xs-12 ">Card Expiration Date</span>
  <div class="col-md-8 col-xs-12 ">
    <input id="UMexpir" name="UMexpir" class="form-control" type="text" placeholder="Card Expiration Date" value="[UMexpir]">
  </div>
</div>
Replace it with:
<div class="form-group">
  <span class="col-form-label col-sm-4 col-xs-12 ">Card Number <font face="Verdana" size="2"color="#ff0000">*
    </font></span>
  <div class="col-md-8 col-xs-12 ">
    <input id="UMcard" name="UMcard" class="form-control" type="text" placeholder="Card Number" value="[UMcard]">
  </div>
</div>
<div class="form-group">
  <span class="col-form-label col-sm-4 col-xs-12 ">Card Expiration Date <font face="Verdana" size="2"color="#ff0000">*
    </font></span>
  <div class="col-md-8 col-xs-12 ">
    <input id="UMexpir" name="UMexpir" class="form-control" type="text" placeholder="Card Expiration Date" value="[UMexpir]">
  </div>
</div>
For every additional field, find
<span class="col-form-label col-sm-4 col-xs-12 ">Field Name</span>
Replace it with
<span class="col-form-label col-sm-4 col-xs-12 ">Field Name <font face="Verdana" size="2"color="#ff0000">*
  </font></span>
Lastly, you will need to modify the summit button. Find the following:
<button class="btn btn-primary center-block" type="submit">Submit</button>
Replace it with
<button class="btn btn-primary center-block" type="submit" onclick="return verify();">Submit</button>
Once you have saved, you will see inline instructions for required fields, and when you click submit, then you will see an error at the top with instructions regarding the required fields:
IMPORTANT: Remember to include the field in the form, if it is required. If you do not give the customer the option to submit the required field, then they will not be able to submit the form. For example, if you have the UMinvoice in the hidden fields you will find the line:
<input type="hidden" name="UMinvoice" value="[UMinvoice]">
To make the field available, delete the line above, and add the below section to to body of the form:
<div class="form-group">
  <span class="col-form-label col-sm-4 col-xs-12 ">Invoice Number</span>
  <div class="col-md-8 col-xs-12 ">
    <input id="UMinvoice" name="UMinvoice" class="form-control" type="text"  placeholder="Invoice Number" value="[UMinvoice]">
  </div>
</div>