Reports
The Reports section of your Reseller console allows you to view, download and print a variety of pre-made reports, as well your own custom designed reports. Summary reports display a simple visual graph and all of the detailed reports can be customized, emailed, printed and exported to your computer.
Report Categories
There are five different categories of reports:
Report Options
Customize
To customize the report, click the Customize button located at the top left of the list of merchants.
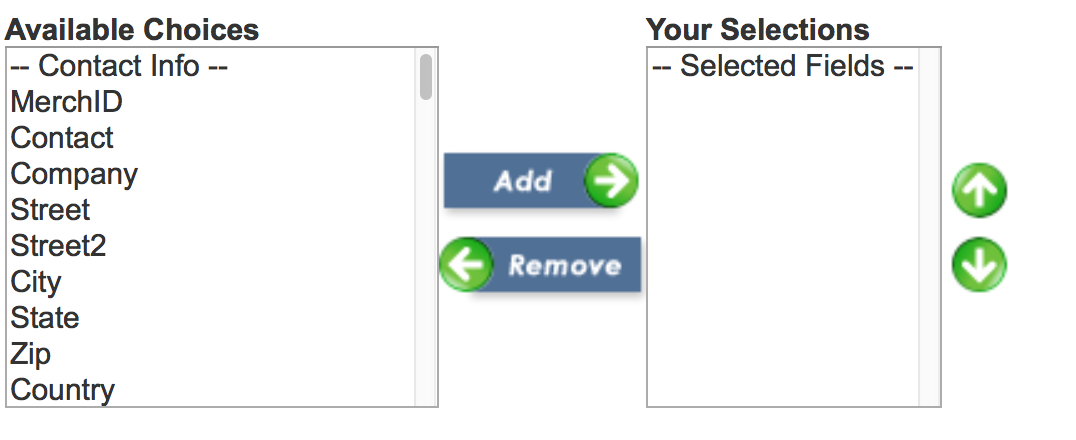
Simply select the fields you would like to include in your report in the left hand column and click the Add button in the middle. To remove fields from your report, select them in the right hand column and click the remove button in the middle. When you are happy with your selections, click the save button at the bottom, or the cancel button to revert to the previous settings.
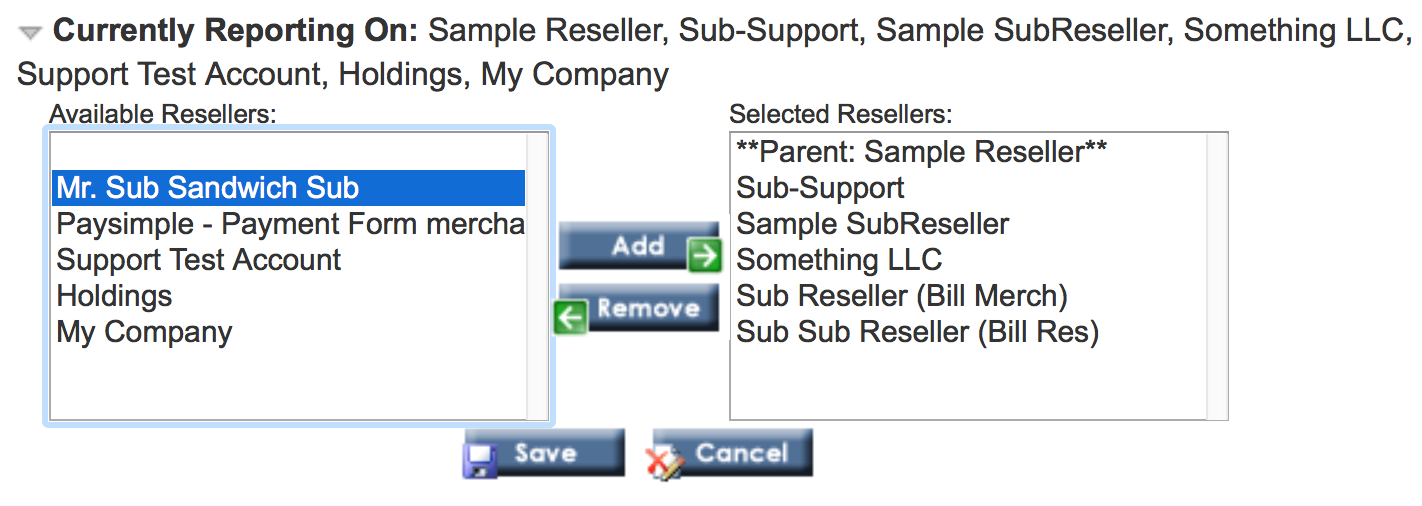
You can also determine which reseller accounts to include in your report. At the top of the screen a thin banner will appear, informing you which resellers are currently being included in the merchant activity report. To add resellers to your report, select the fields you would like to include in your report in the left hand column and click the Add button in the middle. To remove resellers from your report, select them in the right hand column and click the remove button in the middle. When you are happy with your selections, click the save button at the bottom, or the cancel button to revert to the previous settings.
View

To view a selected range of transactions, simply select the start and end dates for the report from the drop down menus at the top left of the screen and click the view button.

To print the report in the range that is displayed on the screen, click the Print button at the top of the screen. A printer-friendly version of your report will be displayed on the screen, and a printer dialogue box will open. Once you have printed your report, use the back button on your browser to return to the reports screen.

To email the selected report to yourself, or another recipient, simply click the Email button at the top of the page. A new screen will open with an email form and the report listed below as an attachment. You will need to enter your email and the email address (or addresses) you would like the report sent to. Be sure to separate each email address in the Email To: box with commas, like this: email@emailone.com, email@emailtwo.com.
Export

To export the selected report, you must first select the format you would like from the drop down menu near the top right of the screen. You can export the report in either tab or comma delimited format for use in programs such as Microsoft Excel. Then click the Export button and your download will begin immediately.
Transaction Reports
The console includes several different reports designed to provide you with the basic reporting tools you need to manage your reseller account. These reports can be viewed on your screen with the click of a button, emailed to one or more email addresses, or downloaded onto your computer and saved or printed for future reference.
There are two types of pre-made credit card reports, the Transaction Summary report, which is a visual graph displaying all merchant credit card activity for the past year, and the Merchant Sales Activity report, which displayed all merchant credit card activity over the last month (or another selected time period) and can be sorted and printed.
Credit Card Processing Summary
This report is a visual graph that displays all of the credit card transactions from the past year. You can view shorter time periods by selecting the month you would like to view from the list at the bottom left of the chart. The report can be displayed as an annual, monthly, or daily graph, with the annual graph broken down by month, the monthly graph broken down by day, and the daily graph broken down by hour.
Below the visual graph are lists of the total number of merchants who completed transactions during the specified time period (broken down into the increments indicated above), as well as the total dollar amount transacted, and the total number of sales, errors, declines, voids and credits.
Credit Card Processing by Merchant
This report is more flexible than the simple transaction summary graph because it allows you to determine the date range you would like to display and also allows you to view, print, email, or export the information to your computer in either tab or comma delimited format. See above for more information.
Check Processing Summary
This report is a visual graph that displays all of the checking transactions from the past year. You can view shorter time periods by selecting the month you would like to view from the list at the bottom left of the chart. The report can be displayed as an annual, monthly, or daily graph, with the annual graph broken down by month, the monthly graph broken down by day, and the daily graph broken down by hour.
Below the visual graph are lists of the total number of merchants who completed transactions during the specified time period (broken down into the increments indicated above), as well as the total dollar amount transacted, and the total number of sales, errors, declines, voids and credits.
Check Processing by Merchant
This report is more flexible than the simple transaction summary graph because it allows you to determine the date range you would like to display and also allows you to view, print, email, or export the information to your computer in either tab or comma delimited format. See above for more details.
The Check Processing by Merchant report displays the following information alphabetically by merchant: Name of merchant, sales, credits, voids, declines and amount.
Application Reports

Application reports allow you to track merchant application and boarding by viewing application information in a collection of simple graphs designed to provide you with the information you need to track reseller progress and new merchant application statistics over time.
Monthly Merchant Summary
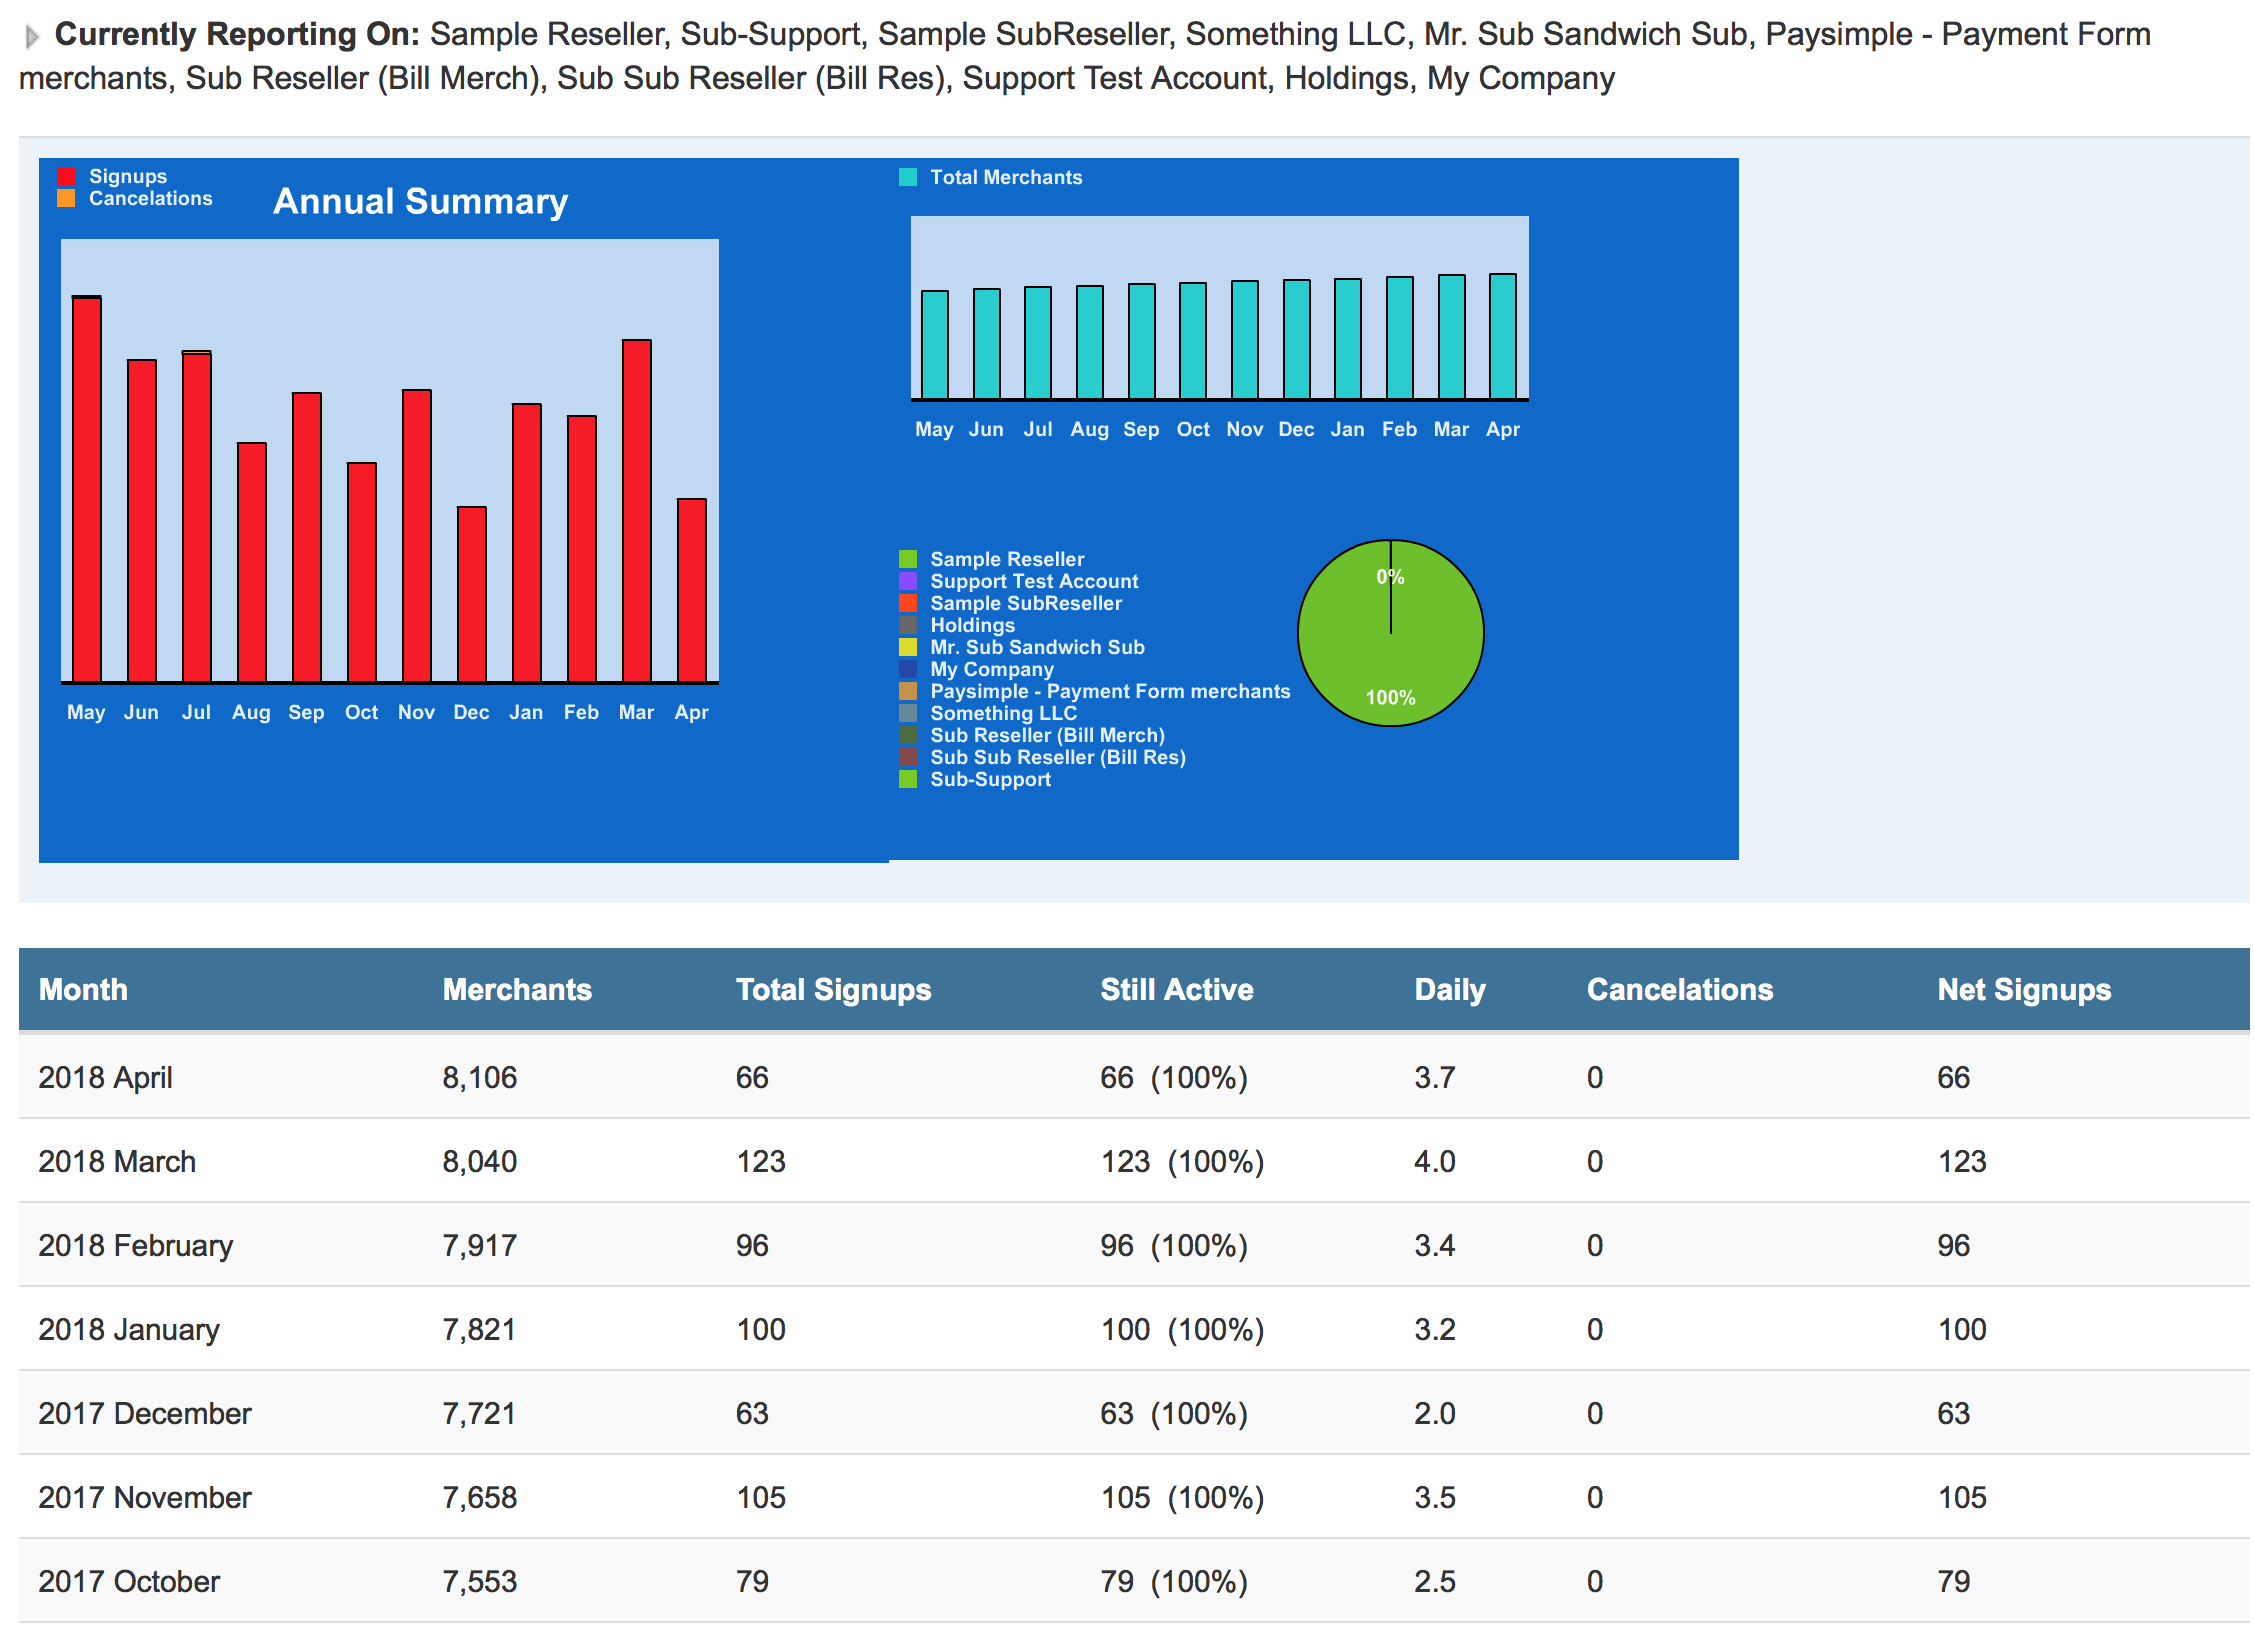
This report displays all of the merchant sign ups and cancellations within the past year broken down by month in the large bar graph on the left and the total number of merchants in the small bar graph on the upper right. Below the total merchants graph is a pie chart in which the number of new merchants is broken down by reseller.
You can also determine which reseller accounts to include in the report. At the top of the screen a thin banner will appear, informing you which resellers are currently being included in the merchant summary report. To add resellers to your report, select the fields you would like to include in your report in the left hand column and click the Add button in the middle. To remove resellers from your report, select them in the right hand column and click the remove button in the middle. When you are happy with your selections, click the save button at the bottom, or the cancel button to revert to the previous settings.
Billing Reports
The Billing Reports help you keep track of financial information as well as which gateway packages each of your merchants is currently using and what they are being charged. You can view charges that are currently pending, past charges, as well as a complete list of feature usage.
Pending Billing
The Pending Billing Report provides you will up to date information about charges pending on merchant accounts as well as any cost to you, the reseller, additional fees and residual payments. This report can be printed, emailed and exported in either tab or comma delimited format.
To reorder the report by Company, Total Collected, Reseller Cost, Collection Fee, or Residual Payout, simply click on the name of the preferred column.
| Billing History Fields | |
|---|---|
| Company | Name of Merchant Company |
| Total Collected | Total amount charged to Merchant by gateway company |
| Reseller Cost | Amount charged to reseller |
| Collection Fee | Fee charged by gateway company for merchant billing |
| Residual Payout | Difference between Total Collected and Reseller Cost - if the Total Collected is greater then the Reseller Cost the number in this column will be positive: the amount that will be passed on to you, the reseller; if the Reseller Cost is greater than the Total Collected the number in this column will be negative: the amount that will be billed to you, the reseller. (The later will most often be the case when you have not enrolled in direct merchant billing and have elected to bill the merchant yourself.) |
Billing History

To view your billing history, select the month you would like to view from the drop-down menu and click the View button.
The Billing History Report allows you to view billing information for merchant accounts as well as any cost to you, the reseller, additional fees and residual payments. This report can be printed, emailed and exported in either tab or comma delimited format. To reorder the report by Company, Total Collected, Reseller Cost, Collection Fee, or Residual Payout, simply click on the name of the preferred column.
This report can be printed, emailed and exported in either tab or comma delimited format.
To reorder the report by Company, Total Collected, Reseller Cost, Collection Fee, or Residual Payout, simply click on the name of the preferred column.
| Pending Billing Fields | |
|---|---|
| Company | Name of Merchant Company |
| Total Collected | Total amount charged to Merchant by gateway company |
| Reseller Cost | Amount charged to reseller |
| Collection Fee | Fee charged by gateway company for merchant billing |
| Residual Payout | Difference between Total Collected and Reseller Cost - if the Total Collected is greater then the Reseller Cost the number in this column will be positive: the amount that will be passed on to you, the reseller; if the Reseller Cost is greater than the Total Collected the number in this column will be negative: the amount that will be billed to you, the reseller. (The later will most often be the case when you have not enrolled in direct merchant billing and have elected to bill the merchant yourself.) |
Feature Usage
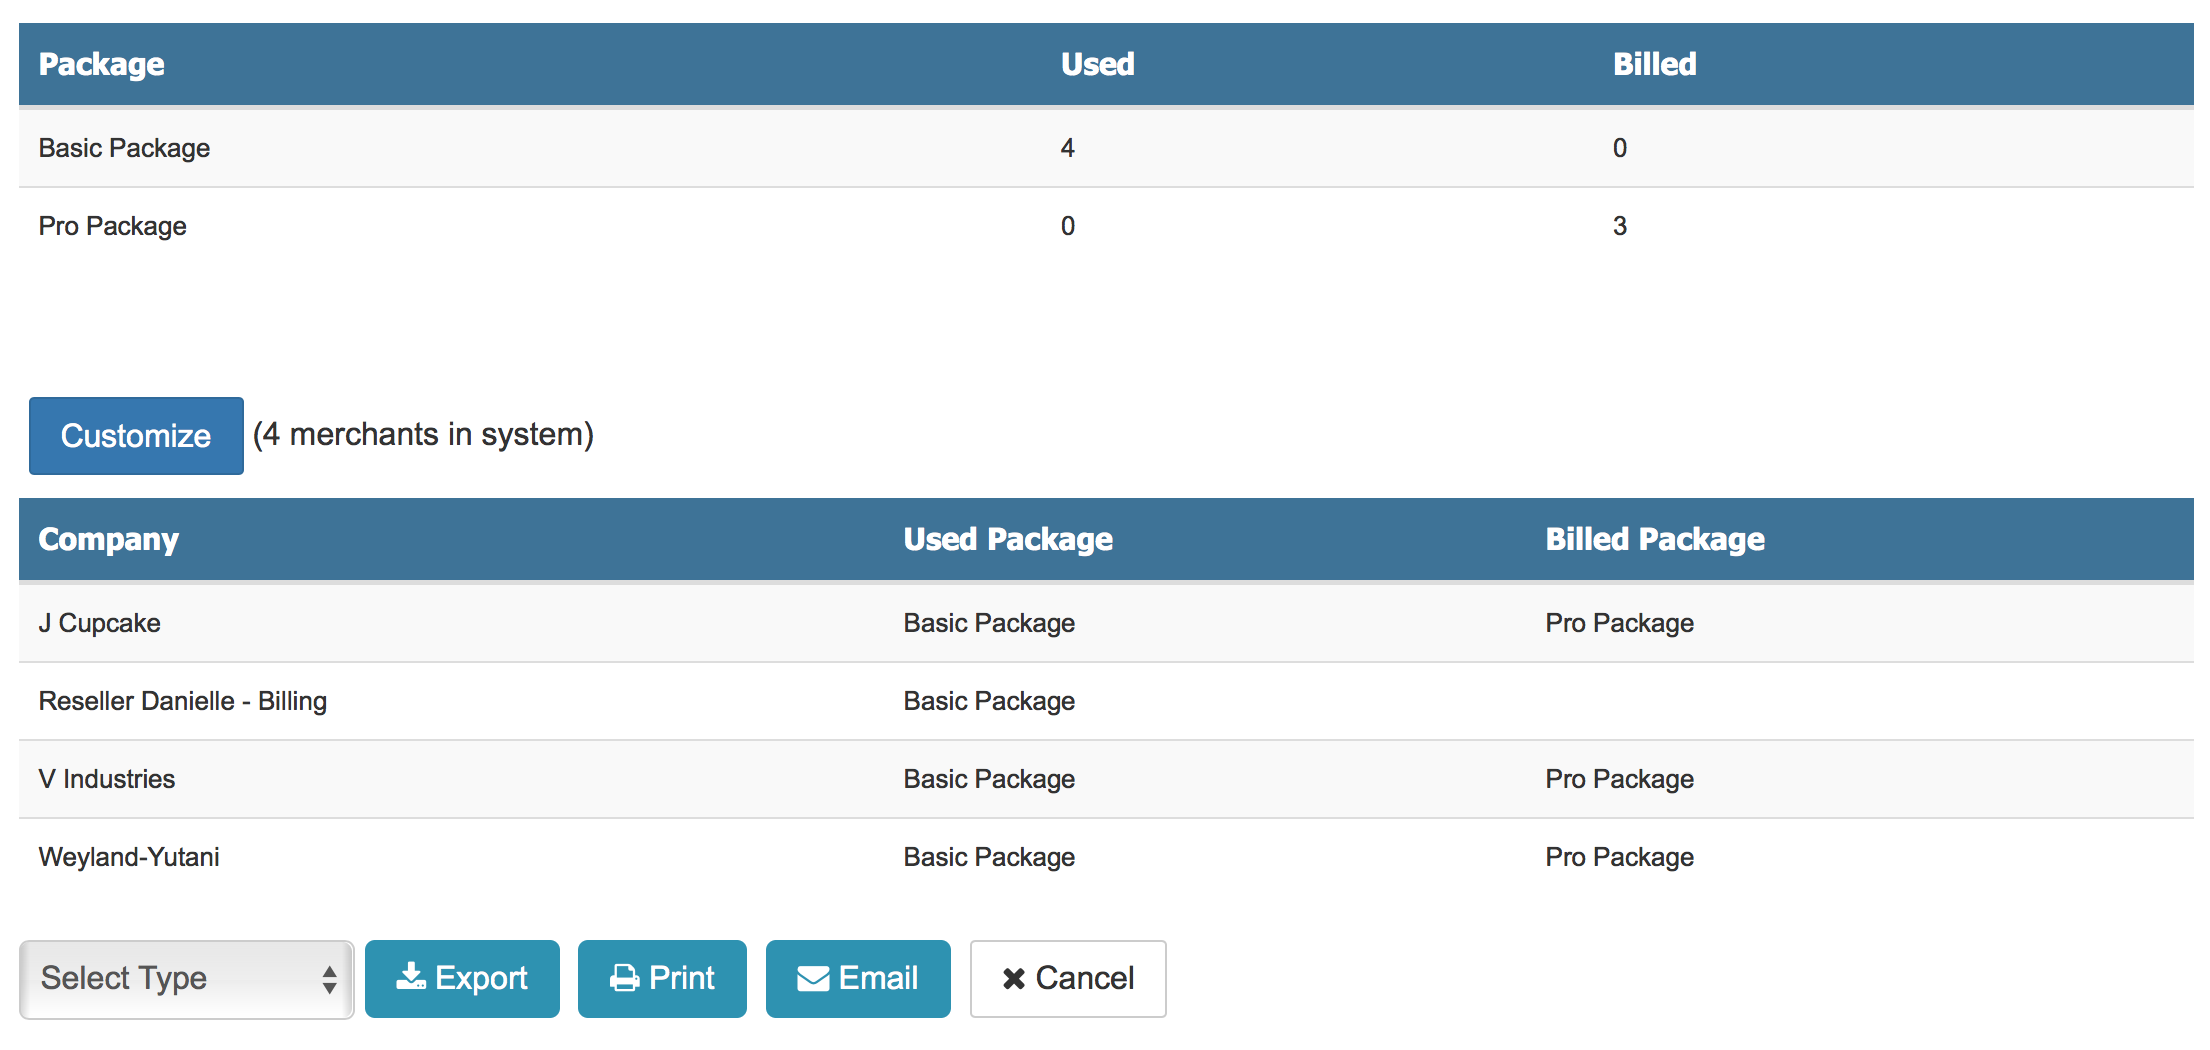
The Feature Usage Report allows you to track how many of your merchants are using each of the available gateway packages and the package for which each merchant was billed. You can also customize this report and add all of the elements listed in the table below for a more comprehensive usage report including merchant information such as Total Sales, Number of Transactions, Number of Sources, Customers in Database and more.
This report can be printed, emailed and exported in either tab or comma delimited format.
Feature Usage Available Fields
| Merchant Statistics | |
|---|---|
| Company* | Name of merchant company |
| Used Package* | Gateway package currently in use by that merchant |
| Billed Package* | Gateway package for which merchant has been billed |
| # CC Trans | Total number of credit card transactions completed by merchant |
| # Check Trans | Total number of check transactions completed by merchant |
| # Debit Trans | Total number of debit transactions completed by merchant |
| Total Amounts | Total dollar amount of all transactions completed by merchant |
| Total Sales | Total dollar amount of all sales completed by merchant |
| Total Declines | Total dollar amount of all declines completed by merchant |
| Total Voids | Total dollar amount of all voids completed by merchant |
| Total Credits | Total dollar amount of all credits completed by merchant |
| Customers in DB | Total number of customers in the merchant's Customer Database |
| Customers w/Billing | Number of customers in database enabled for recurring billing |
| Num Batches | Number of batches settled by merchant on a regular basis |
| Num Sources | Number of sources through which merchant passes transactions |
| Num Sources w/Pin | Number of those sources that have an assigned PIN |
| Custom Pay Forms | Number of custom designed pay forms currently in use by merchant |
| Users | Number of users associated with merchant account |
| Batch Uploads | Number of batches uploaded to merchant account |
| Custom Reports | Number of custom reports created and currently in use by merchant |
| Basic Fraud | Number of basic fraud modules assigned to merchant account |
| Advance Fraud | Number of advanced fraud modules assigned to merchant account |
| Merchant Info | Account specific merchant information |
| Merch ID | Merchant identification number |
| Merchant Message | Merchant message (if any) |
| Date Activated | Date on which merchant's account was activated |
| Reseller ID | Identification number of reseller company that activated the merchant account |
| Reseller Company | Name of reseller company that activated the merchant account |
| Deleted | Total number of accounts that have been deleted |
| Active | Total number of accounts that are currently active |
| Last Transid | Identification number of last completed transaction |
| Testmode | Number of accounts in testmode |
| Agree ID | |
| Agree Date | Date on which merchant |
| Delete Date | |
| Call in Pass | Merchant's call in password, if any. The call in password is requested by the customer service agent when a merchant calls customer service for assistance. |
| Max Logins | Maximum number of logins allowed in a 24 hour period |
| Printed | |
| Merchant Contact Info | |
| Contact | Name of contact person at merchant company |
| Street | Street address, line one |
| Street 2 | Street address, line two |
| City | Merchant's city |
| State | Merchant's state |
| Zip | Merchant's zip code (+four) |
| Country | Merchant's country |
| Merchant's primary email address | |
| Alt Email | Merchant's secondary email address |
| Reseller Email | Email of reseller managing the account |
| Fax | Merchant's fax number |
| Phone | Merchant's phone number |
| Mobile Phone | Merchant's mobile phone number |
| Merchant Billing Info | |
| ACH Routing | Merchant's Automated Clearing House routing number |
| ACH Account | Merchant's Automated Clearing House account number |
| ACH Bank | Merchant's Automated Clearing House bank |
| Bank | Merchant's bank |
| Merchant Check Platform | |
| Platform | Merchant's check processing platform |
| Credit Cards Activated | Denotes status of credit card processing |
| Industry | Merchant's industry type (e.g. Restaurant, Retail, Online, etc.) |
| Recurring Mode | Denotes whether merchant account is enabled to process recurring billing |
| Merchant # | Merchant number |
| Merchant ID | Merchant ID number |
| Terminal ID | |
| TSys BIN | |
| TSys Agent | |
| TSys Chain | |
| TSys SID | |
| TSys TID | |
| TSys Merch Name | |
| TSys City | |
| TSys State | |
| TSys City Code | |
| TSys Local Phone | |
| TSys Sevice Phone | |
| Cardinal Enabled | |
| Cardinal Proc ID | |
| Cardinal Merch ID | |
| Pay Tech Client | |
| Pay Tech MerchID | |
| Pay Tech TermID | |
| Global BankID | |
| Global MerchID | |
| Global Term Type | |
| Planet Merchid | |
| Planet User | |
| Planet Pass | |
| Planet TermID | |
| Planet Currencies | |
| Planet Platform | |
| FDMS North MCC | |
| FDMS NorthMid | |
| FDMS North TID | |
| Check Processor | |
| Checks Activated | |
| VeriCheck Tax ID | |
| VeriCheck Pin | |
| VeriCheck MID | |
| VeriCheck Host | |
| Digital EFT user | |
| Digital EFT Password | |
| Digital EFT Filecode | |
| Check Care User | |
| Check Care Password |
Merchant Reports
Merchant Reports allow you to keep track of your merchant's activity and account information including what kind of operating system and browser each merchant is using as well as how many sources and keys each merchant has.
Merchant Logins
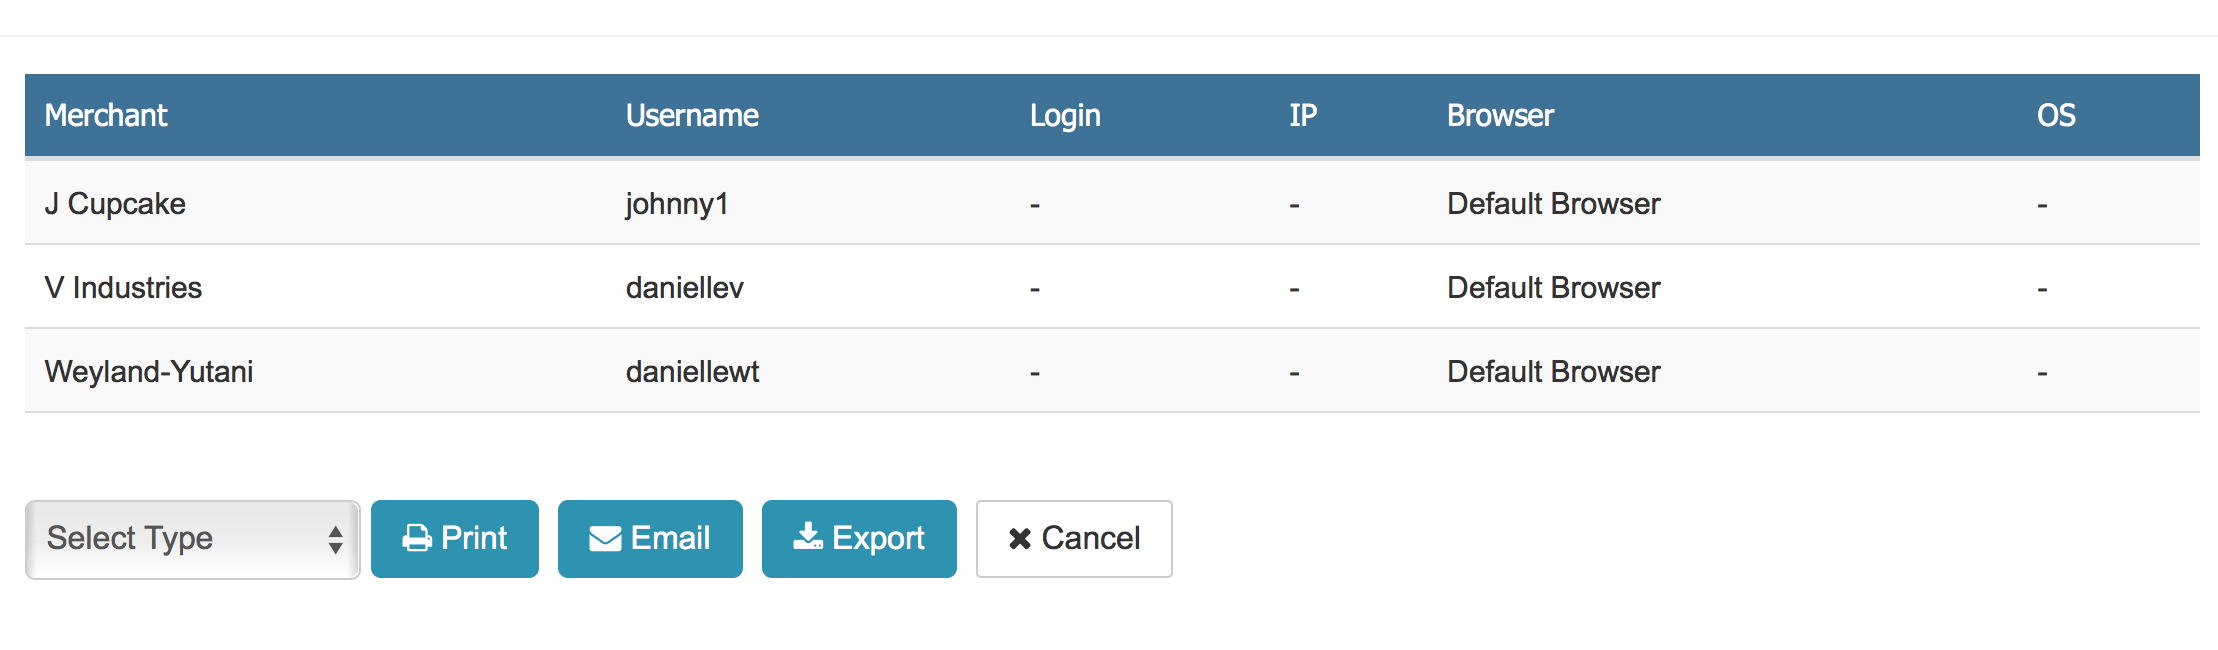
This reports provides a brief summary of all of the most recent merchant logins. In an alphabetical list by company name, the report will display the company name, the username of the last person to login, the date and time of the login, the IP from which the user logged in, their browser type (ie: Internet Explorer, Firefox, etc.) and the OS (Operating System) that they were using.
To reorder the list by any of the other column headings, simply click on the heading you'd like to define the order of the list.
This report can
| Merchant Login Fields | |
|---|---|
| Merchant | Name of merchant company account |
| Username | Merchant username used on last login |
| Login | Timestamp of most recent merchant login |
| IP | IP address from which last login was made |
| Browser | Type of browser used for last login (e.g. Internet Explorer 7.0, Firefox 3.0, etc.) |
| OS | Type of operating system used for last login (e.g. Mac, Windows, Linux etc.) |
Software and Source Keys
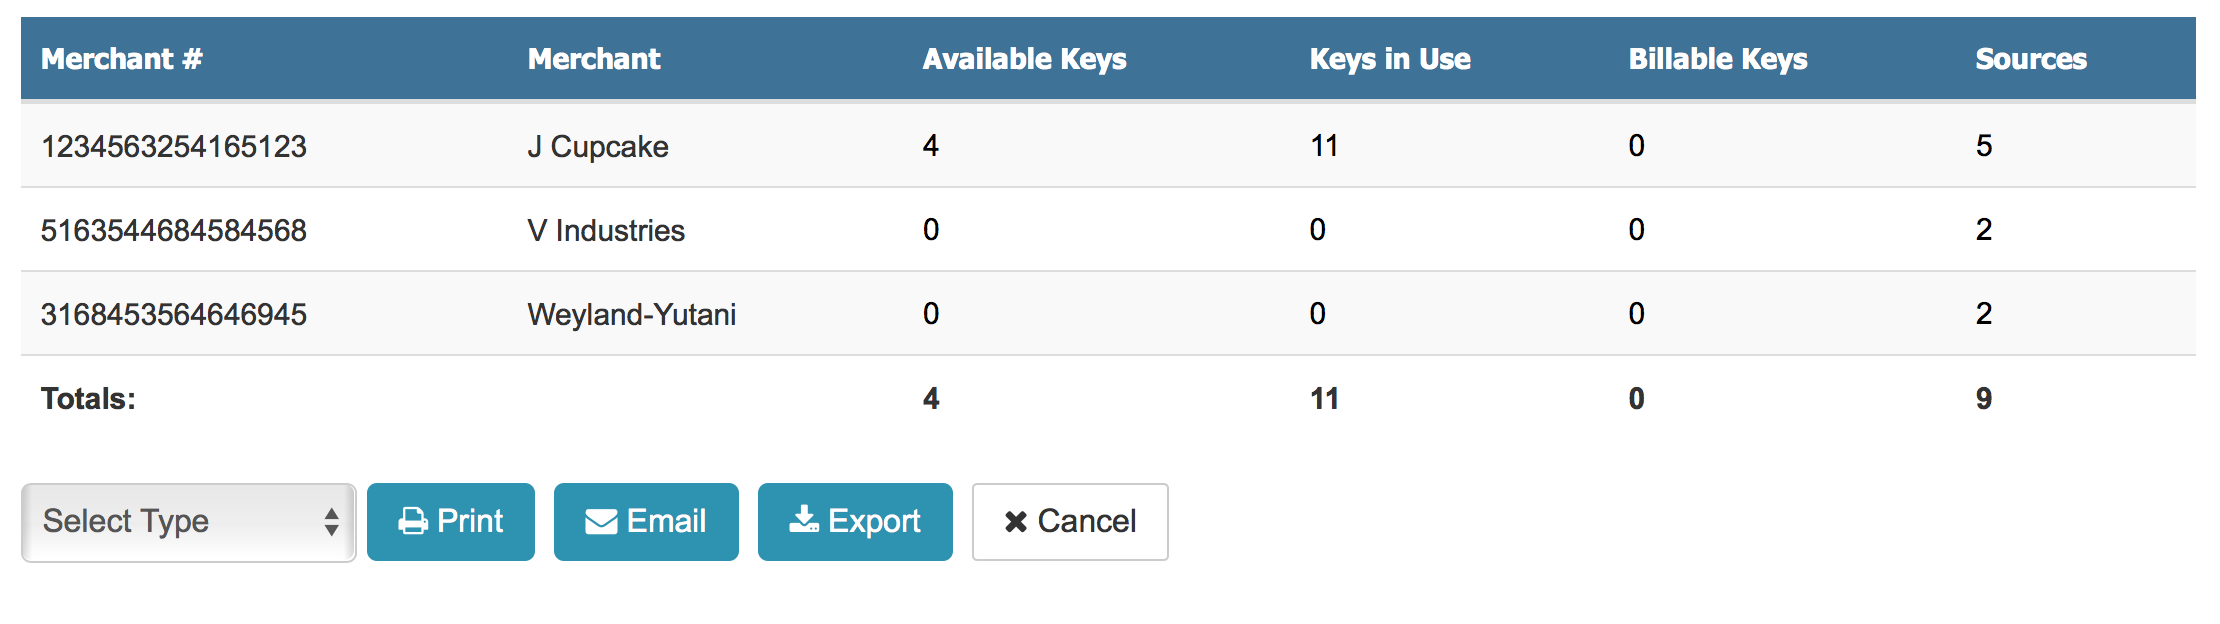
This summary report displays the total number of software activation keys available for each merchant account as well as how many of the keys have been activated and are currently in use, and the total number of sources belonging to the merchant.
This report can be printed, emailed, or exported in tab or comma delimited format. (See above for detailed instructions.)
Custom Reports
In addition to the variety of pre-made reports described above, the reseller console reports section also provides the tools you need to create unique custom reports. Once you have created and saved a custom report, it will be displayed on the main reports page under the Custom Reports header. Reports will be displayed by the name you assign to them at the time the report is created.
To create a custom report, simply click on the Create Report button at the bottom center of the screen and follow the four steps outlined below.
Once you have created a custom report it will appear on the main reports screen under the Custom Reports heading. You may create as many or as few custom reports as you like, and may edit them by clicking on the pencil icon to the right of the report name, or delete them by clicking on the trash can icon.
Step 1: Filter Merchants
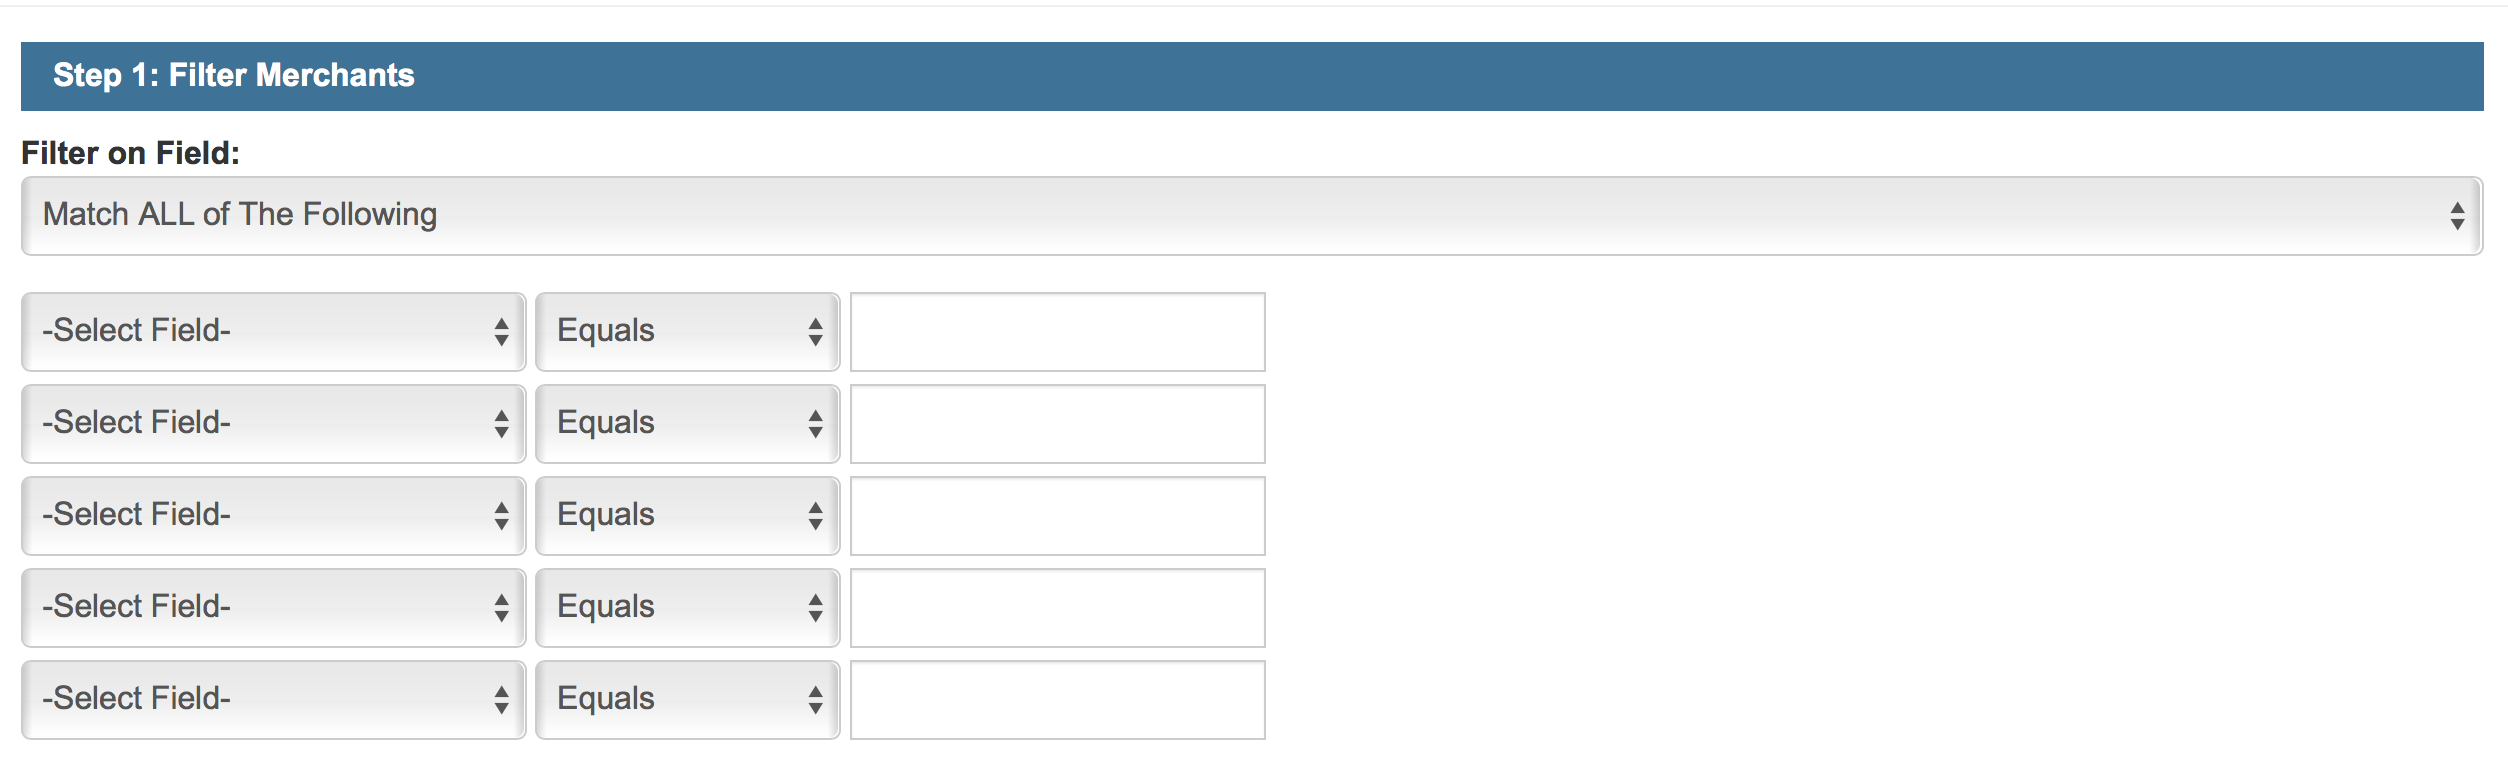
The first step in the process of creating you very own custom report is to select the fields by which the report will be filtered. You can filter your report by the following elements.
| Merchant Contact Information | |
|---|---|
| Merch ID | unique merchant ID number assigned by the system |
| Contact | the contact person for a specific merchant |
| Company | name of merchant business |
| Street | merchant street name |
| Street 2 | additional street information |
| City | city in which merchant (or merchants) do business |
| Zip | zip code in which merchant (or merchants) do business |
| Country | country in which merchant (or merchants) do business |
| merchant email address | |
| Phone | merchant contact telephone number |
| Fax | merchant fax number |
| Message | message included in merchant's account |
| Merchant Details | |
| Active Account | merchant account status |
| Date Created | date on which merchant account was created within your reseller system |
| Credit Card Processing Details | |
| Check activated | merchant credit card processing activation status |
| Platform | credit card processing platform for which merchant is enabled (FDMS, Vital, Planet Payment, etc.) |
| Merchant Number | |
| MID | |
| TID | |
| Check Processing Details | |
| Check Activated | status of merchant check processing capabilities |
| Check Processor | check processing platform (if any) for which merchant is enabled (usually Vericheck or Digital EFT) |
| Billing Information | |
| Bank Name | name of merchant service bank |
| Routing Number | merchant service bank routing number |
| Account Number | merchant service bank account number |
| Reseller Information | |
| Reseller Name | |
| Reseller Email | |
| 30 Day Rolling Statistics | |
| Total Transaction Count | total number of transactions completed by any single merchant in the past 30 days |
| Sales | total number of sales completed by any single merchant in the past 30 days |
| Credits | total number of credits completed by any single merchant in the past 30 days |
| Declines | total number of declines completed by any single merchant in the past 30 days |
| Voids | total number of voids completed by any single merchant in the past 30 days |
| Sales $ Amount | total dollar amount of sales completed by any single merchant in the past 30 days |
Step 2: Select Fields
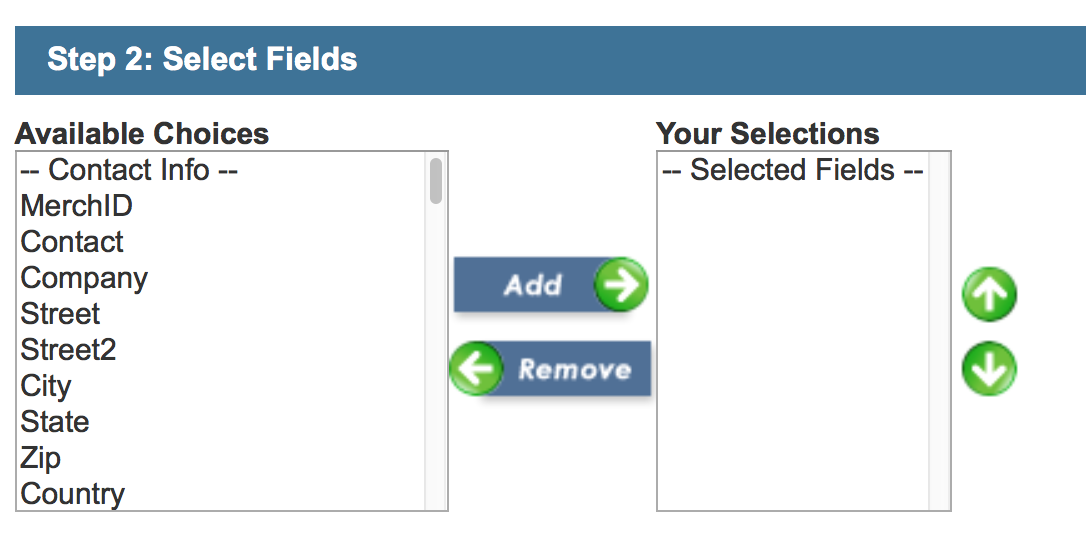
Once you have created the filters you need, you can then select the fields that you would like to include in the report. These may be the same as some of the filters you created, or they may not. You may choose as many or as few fields as you like. To sele3ct a field simply click on the name of the field in the left column and click the Add button in the center. Once you have selected the fields you can change the order in which they will appear in your report by selecting a field in the right column, then clicking the up or down arrows to the right.
The list of fields that can be included in your custom report is identical to the list of fields by which you filtered. (See table above.)
Step 3: Choose Sort Order

Once you have decided what fields to include in your report, you must choose the order in which those fields should be sorted. You may wish to sort by name, number or date, just make sure when you select the fields you would like the report sorted by that they are fields that you have selected to appear in the report. For each of the sorting fields, select whether you would like the column to sort in ascending or descending order.
Step 4: Enter Report Title

You're almost done! Just enter a title for your new custom report and click the Save button at the bottom of the screen. Be sure to name your new report something descriptive so that you will remember what kind of report it is when you run reports in the future.