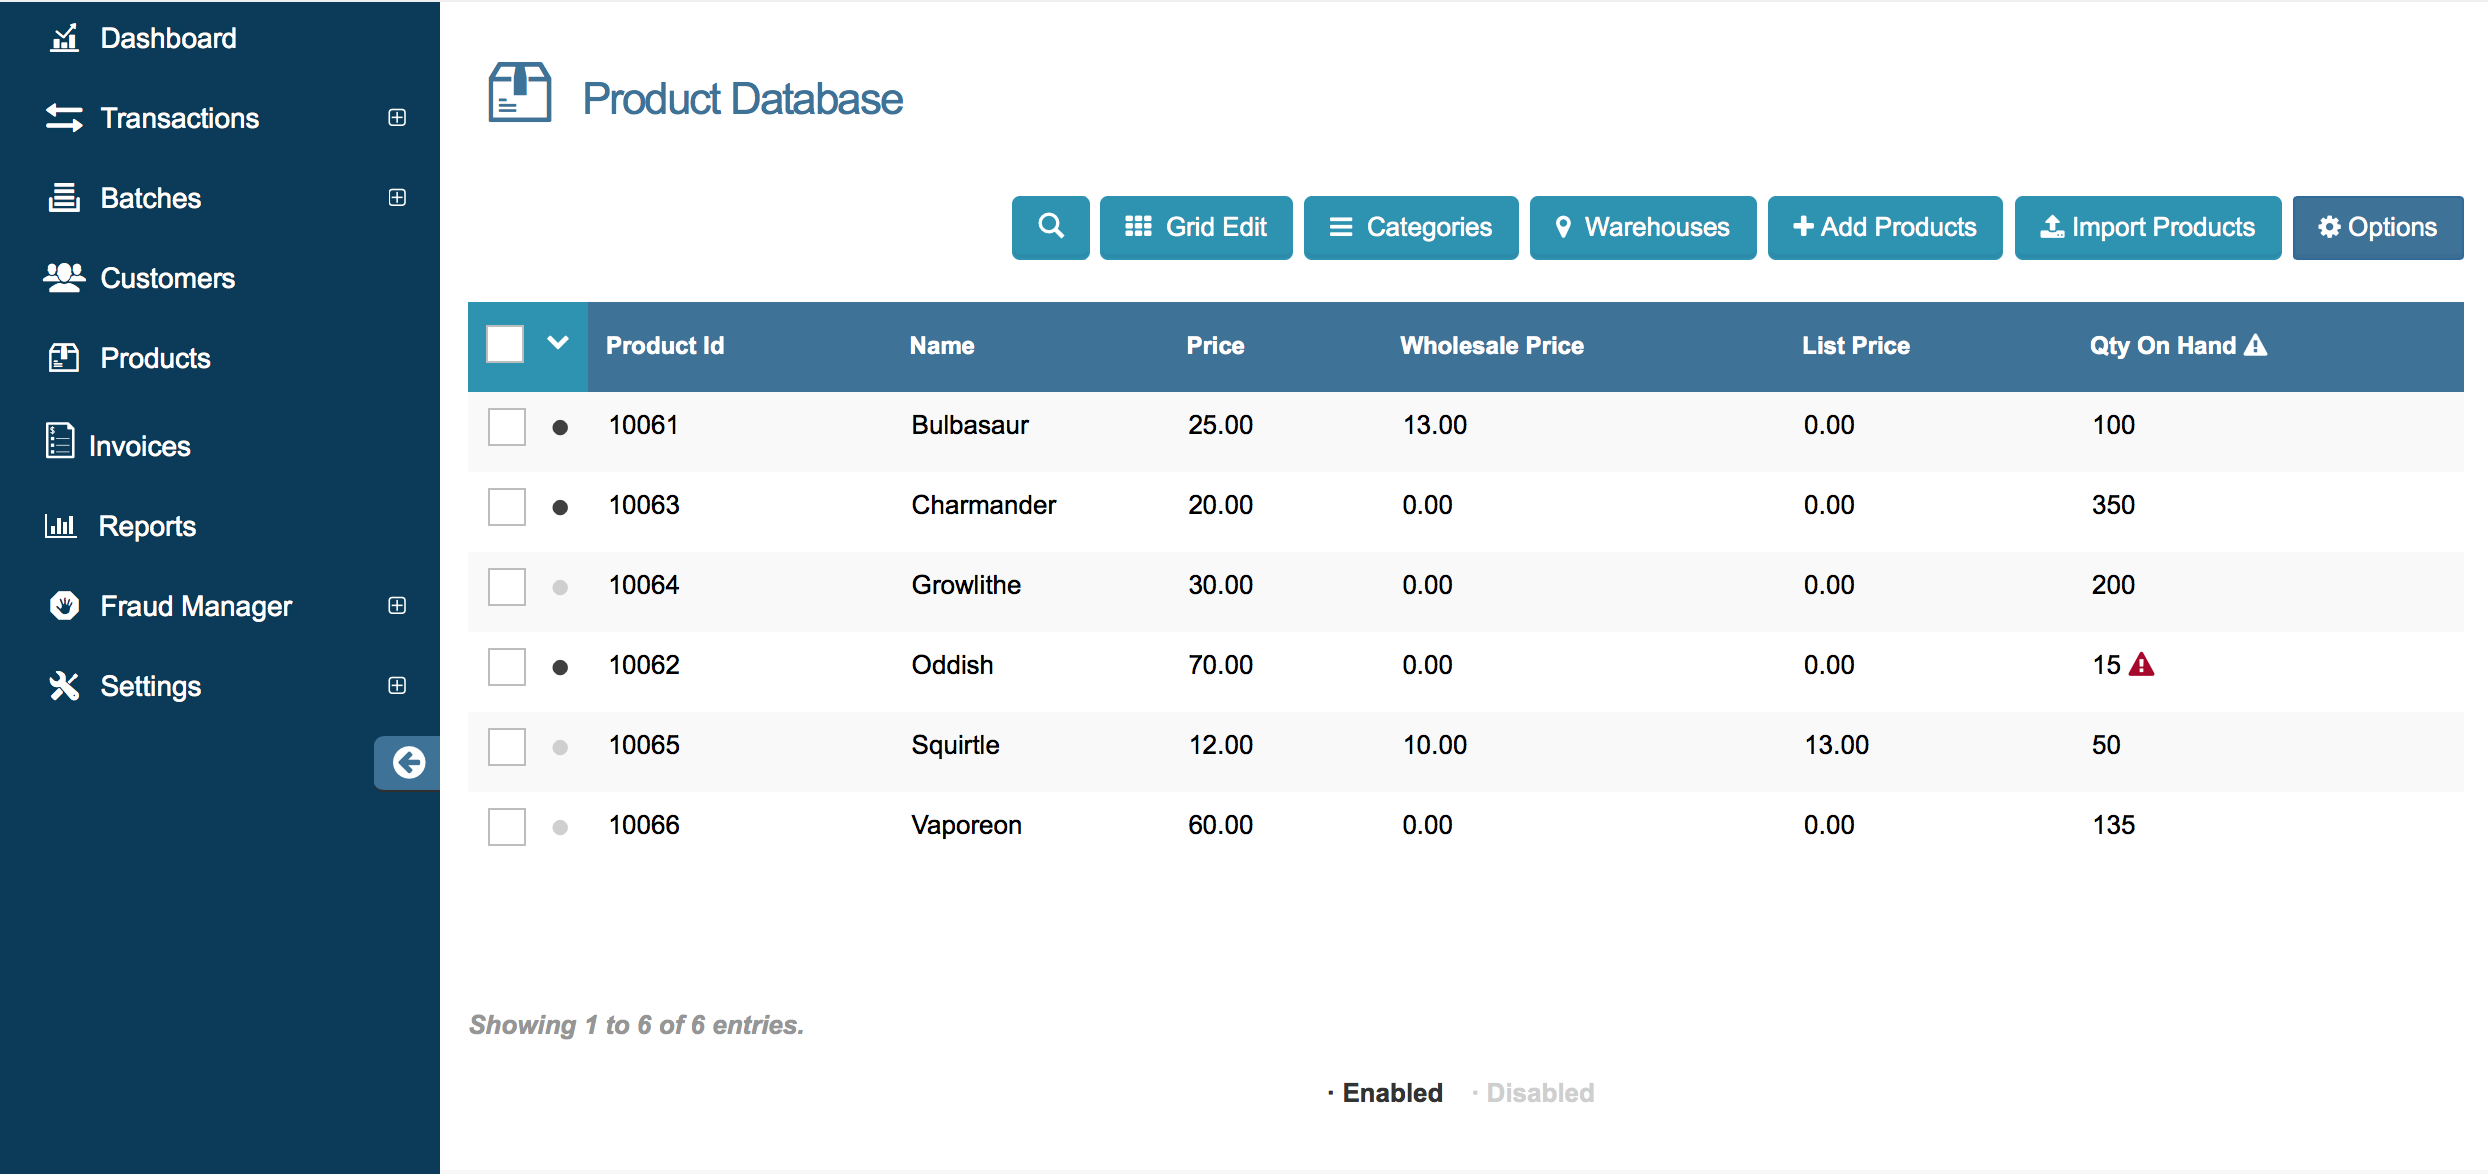
Product Database
The merchant console allows you to add, edit, track, and manage all of your products through a single, easily customizable database.
Customize View
Rearrange Your Table
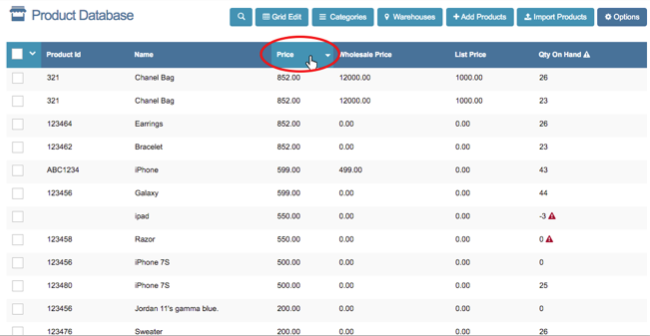
By default, your Product Database table is arranged in alphabetical order. The table can be sorted or rearranged by any of the listed fields, by clicking the title of the field in the header line. Click field in the header line again to rearrange the list from ascending to descending order and vice versa. The image below shows an example of a merchant sorting the table by highest price to lowest price.
Customize Your Table
By default, the Products Database table displays the following columns: Product ID, Name, Price, Wholesale Price, List Price, and the Qty on Hand. This table can be customized by adding and deleting specific fields.
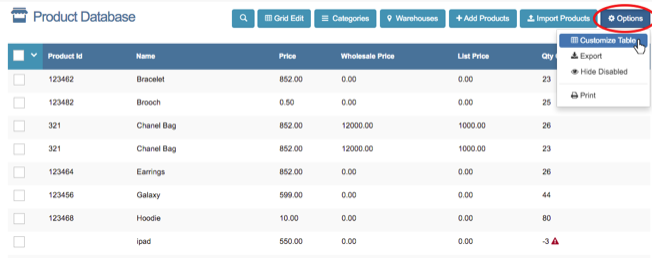
Click  located at the top right hand side of the page, then select ‘Customize Table’ from the drop down menu.
The Table Options pop up window will appear showing your ‘Current Fields’ and ‘Available Fields’. To add more columns into your Product Database table, drag and drop a field button into the ‘Current Fields’ section. To remove a specific a field, click the field button you want to remove and drag it onto the ‘Available Fields’ section.
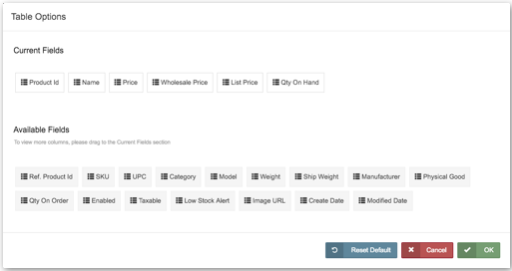
Once you have finished adding or deleting specific fields, click  . To reset your Product Database Table to default, click
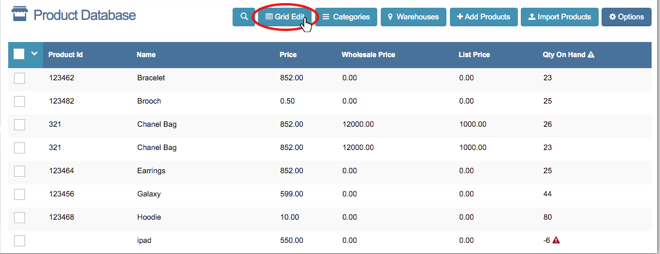
Edit Your Products Using Grid Edit
Much like the Customer Database, Grid Edit allows you edit all product information at once. Please NoteYou can only change information based on the displayed column fields. To add more field columns to your Product Database table, see the Customize Your Table section of this page.
To edit your products using Grid Edit, click  .
.
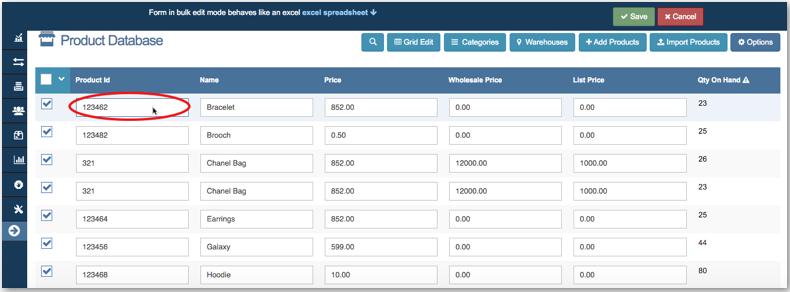
Each column field then becomes editable. As shown in the image below, the merchant is able to edit the Product ID, Name, Price, Wholesale Price, and List Price. To edit Qty on Hand, click on the product when no in Grid Edit mode and adjust the QTY in the product profile.
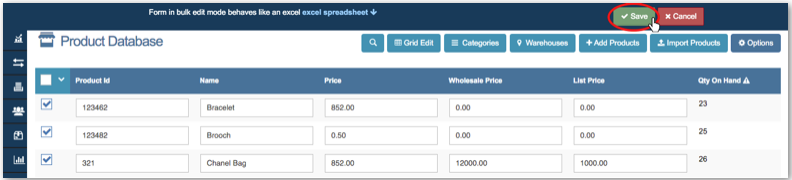
Once you are done editing the fields, click  .
.
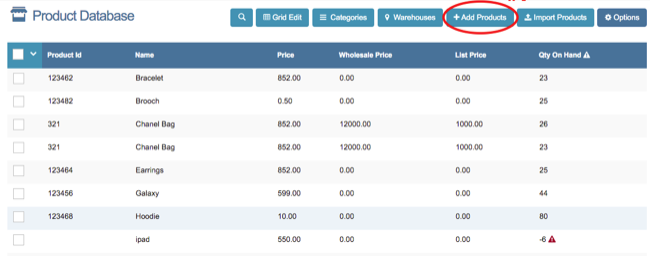
Add A New Product
You can add a new by clicking  located at the top right hand side of the Product Database page.
After you create a product profile, you will be able to add information in the following sections.
Details

- Product Name
- Manufacturer
- Product Model
- Product ID: This is a user assigned product identification number.
- SKU: This is the product’s Stock Keeping Unit number.
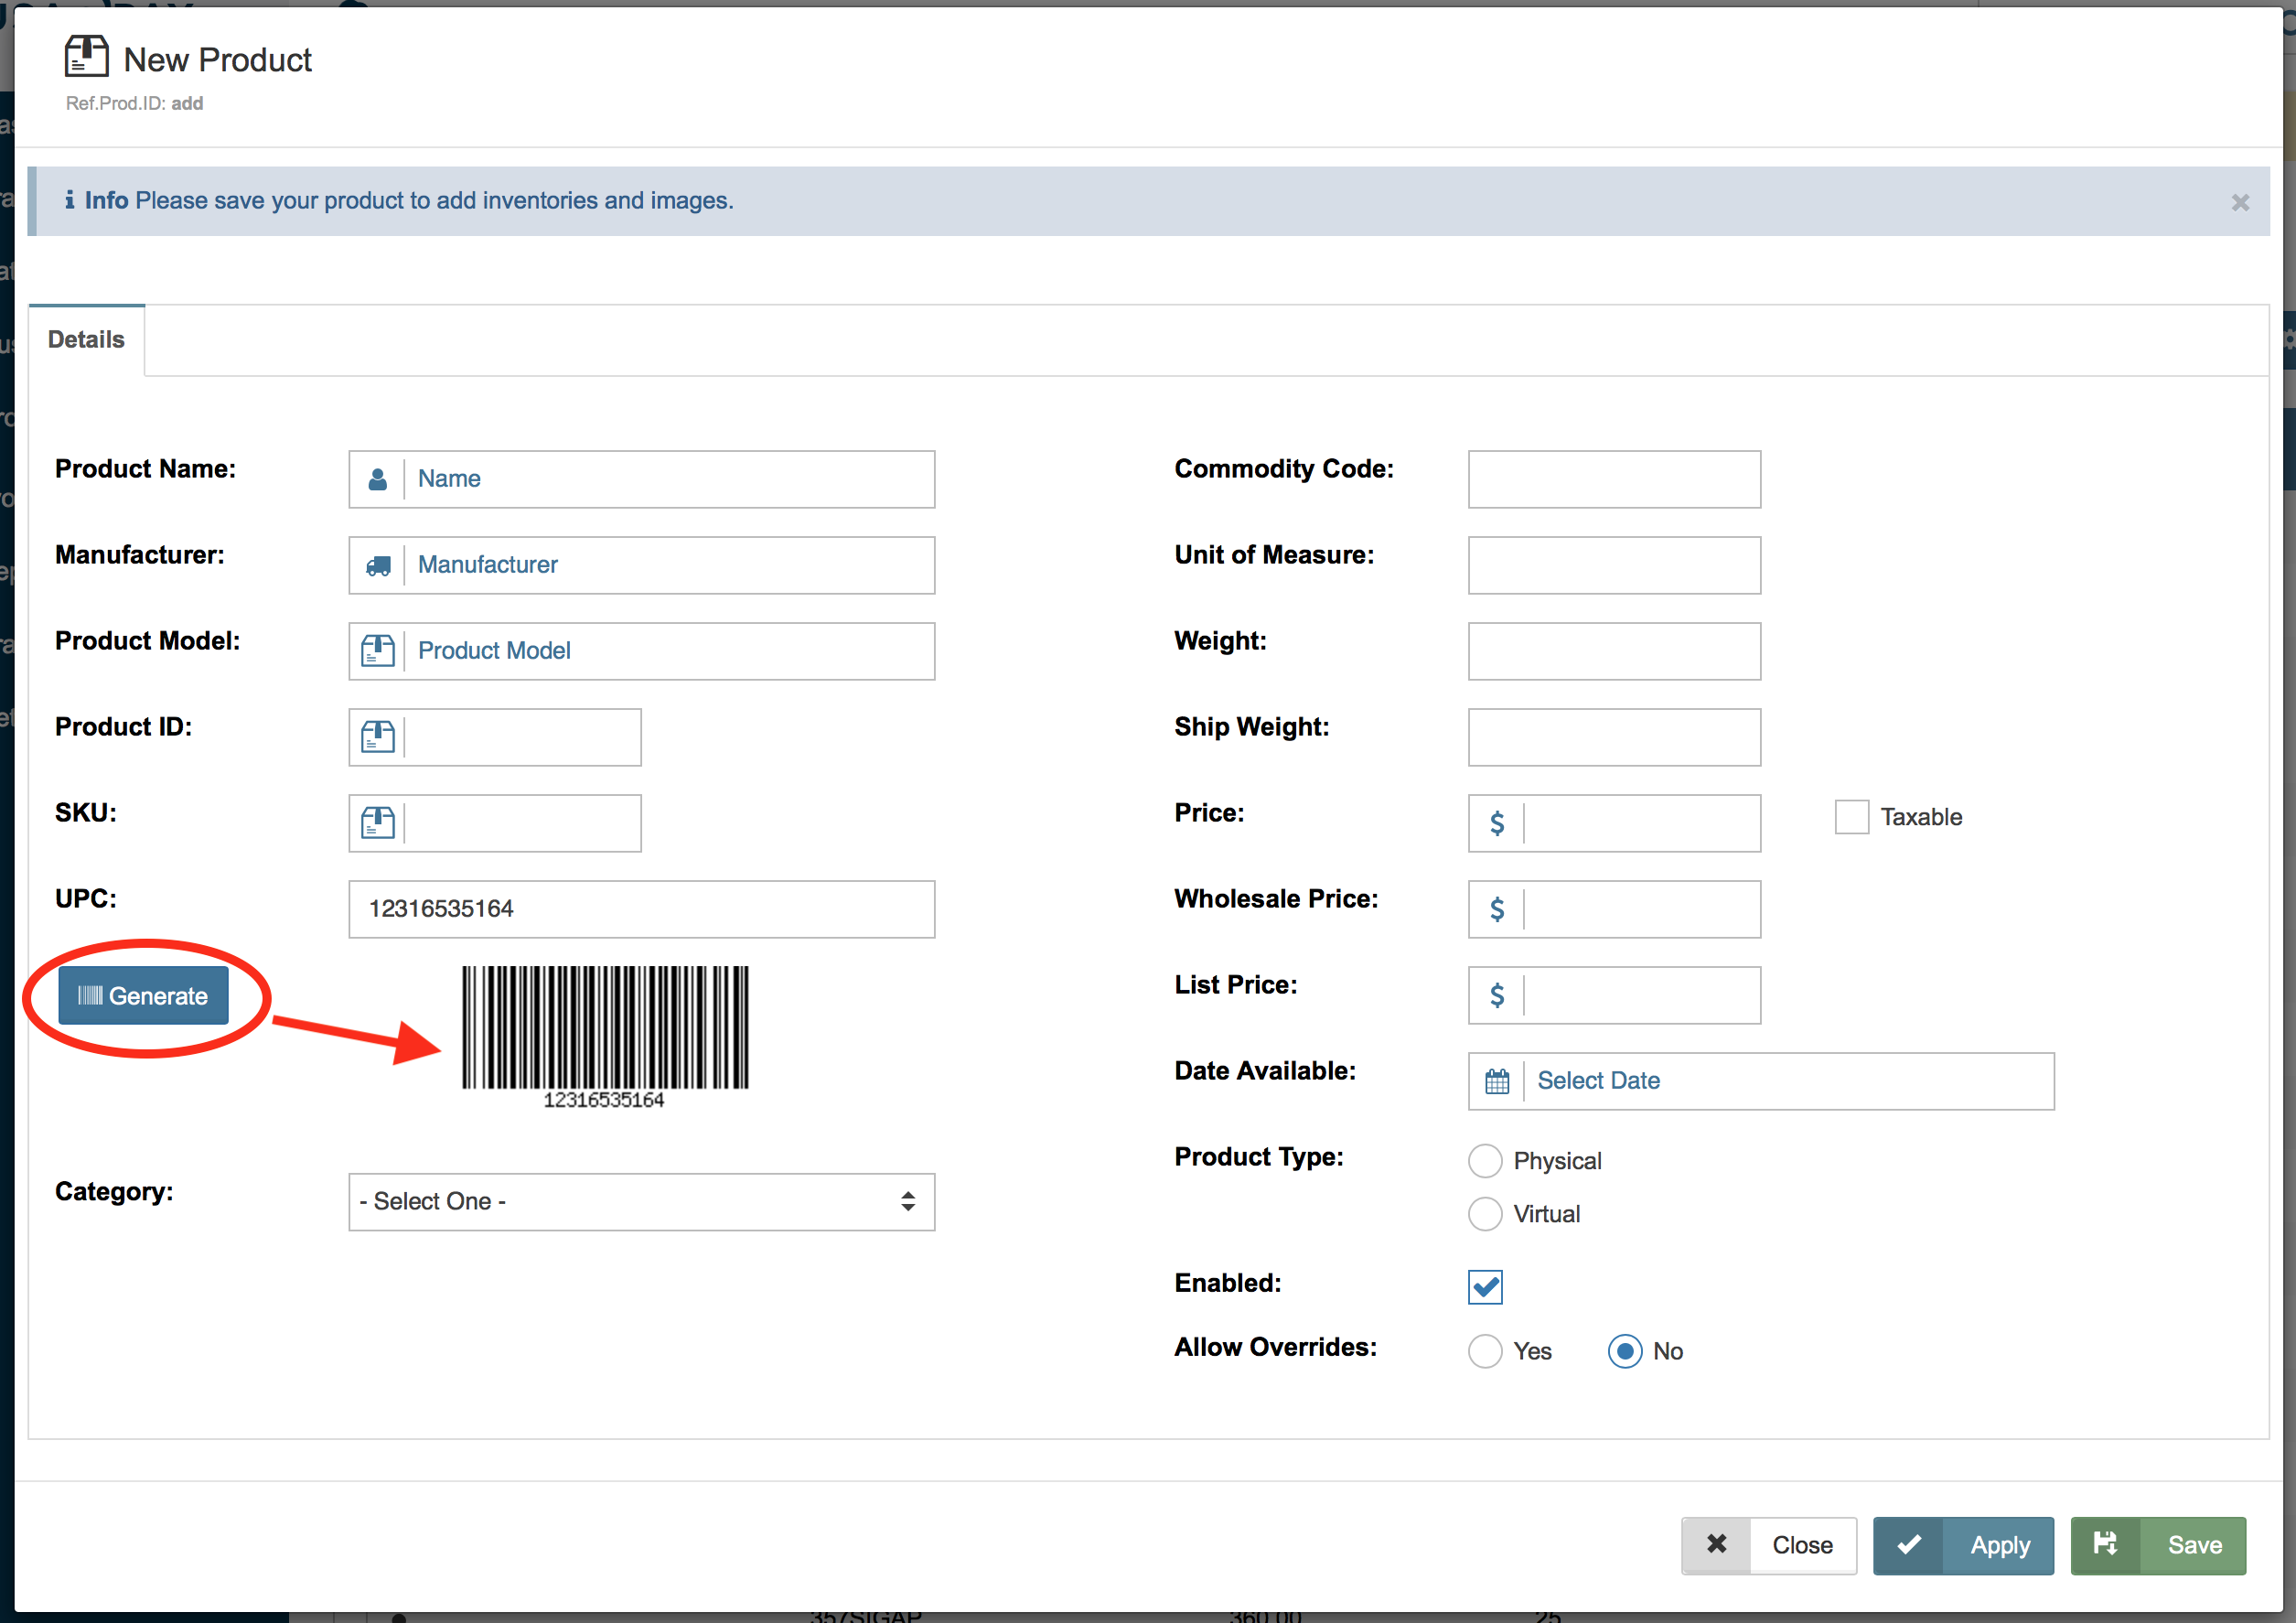
- UPC: This is the product’s Universal Product Code. You can assign the product’s UPC and generate a barcode. Click
 to generate the barcode. If you would like the product database to generate a default number, you can set that in the Product Database section of your General Settings.
- Category: Select a category from the drop down or add a new product category. To add a new product category, select ‘Add New Category’ at the bottom of the drop down menu.
- Commodity Code: Commodity codes are standard classification codes for products and services. Click here for a list of Commodity codes.
- Unit of Measure: For a list of commonly used unit of measure codes click here.
- Weight: This is the product’s total weight.
- Ship Weight: This is the product’s weight adjusted for packing and shipping purposes.
- Price: The cost of the product. This is what the customer will be charged when adding this product to an order or invoice.
- Taxable- Check the ‘Taxable’ box to add tax to the product.
- Wholesale Price
- List Price: The manufacturer’s suggested retail price or MSRP.
- Date Available: The date the item will be available. Select the date when the product is available to sell. Leave this blank if you want the product to be available immediately.
- Product Type: Choose if the product is Physical (eg. a Hard cover book) or Virtual (eg. an eBook).
- Enabled: Check this box, to make the product available to sell immediately.
- Allow Overrides: Defaults to
No. SelectYesif you would like to be able to change the price of the product when adding it in New Order or to an Invoice.
Click  to save the entered information. New tabs (Inventories, Price Tiers, Description, and Images) will appear once you click .
Inventories
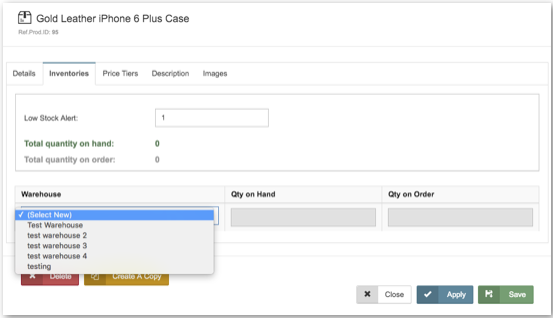
Click on the ‘Inventories’ tab. The inventories tab allows you to enter the quantity of each product as necessary. You may also assign each item a minimum quantity and break down the total inventory by warehouse to better track your stock.
To assign quantities to individual warehouses, choose a warehouse from the drop down menu, then enter the quantity of the product on hand and the quantity of the product on order. You may add as many warehouses as necessary.
Click to save the entered information and go to the next step.
Please Note: You can also add inventory to multiple products at once using the Inventory Receiving screen. Click here for more details.
Price Tiers
Click on the ‘Price Tiers’ tab. The ‘Price Tiers’ tab allows you to put a specific product on discount or promotion. To add a price tier, click 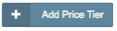 .
.
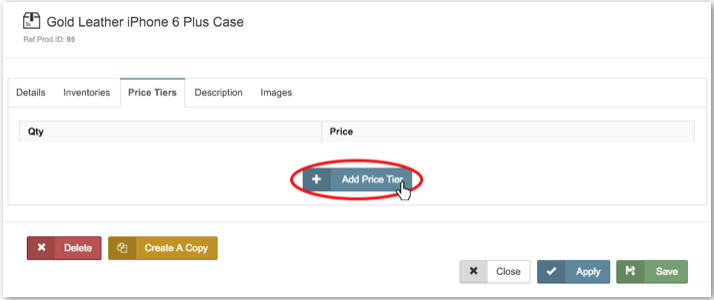
The Qty and Price field will appear. As an example, a merchant placed the Gold Leather iPhone 6 Plus Case on promotion: Enter the value “3” for the Qty and enter “35.00” for the price. This means that if a customer buys 3 cases, the customer gets each case for $35.00.
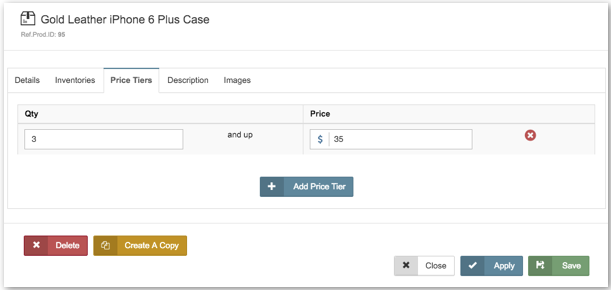
Multiple price tiers can be added and deleted for each product.
Click  on the side of each price tier to delete a price tier.
Click to add another price tier.
Click to save the information you entered then proceed to the next step.
Description
Click on the ‘Description’ tab. This tab allows you to enter a description or additional information about the product. Once you have entered the description, click and go to the next step.
Images
Click the ‘Images’ tab. The Images tab allows you do upload an image for the product. To upload an image, drag and drop the image on the ‘Drag Image Here’ box or click on ‘Upload Files’ as shown in the image below.
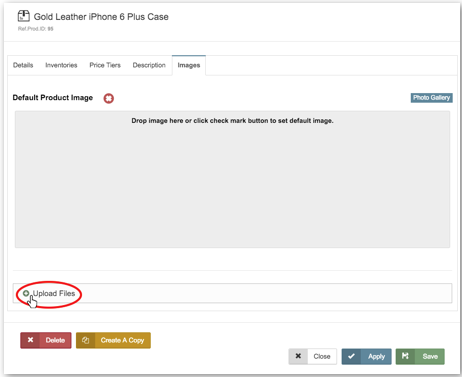
Please Note: The valid file formats are .jpg, .jpeg, .gif, .png; Maximum file size: 5 MB.
Click to save all the information you entered and click to return to the Products Database page.
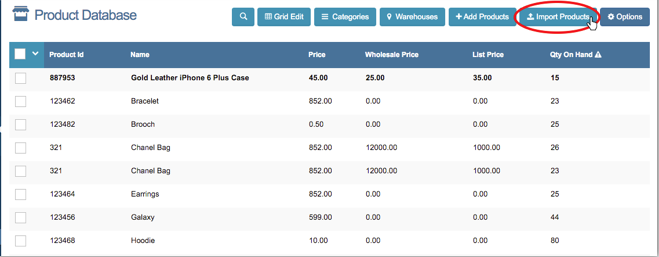
Import New Products
The Product Database allows you to import multiple products by uploading a CSV file. You can find a template for uploading products below:
Step 1: Initiate
Click 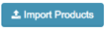 located at the top right hand side of your screen.
Step 2: Choose File
Select the file you would like to import by using the ‘Drag & Drop Files Here’ option. You can also import your file by clicking on the ‘Drag & Drop Files Here’ box and selecting the file from your computer.
Please Note: It is recommended that you use a comma separated text format for importing.
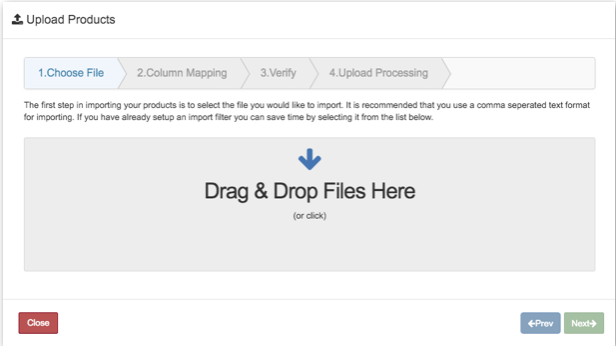
After selecting the file, click 
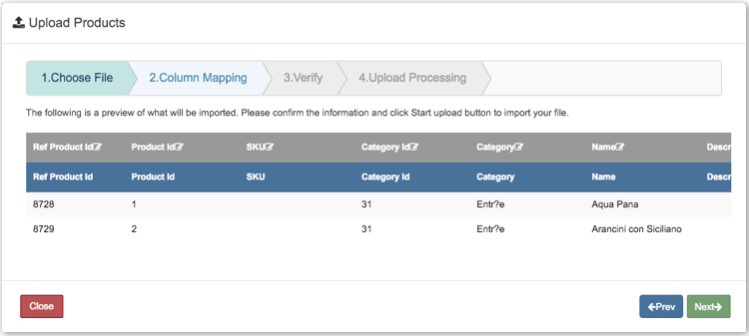
Step 3: Column Mapping
After uploading the file, make sure all the fields match their corresponding field type or name.
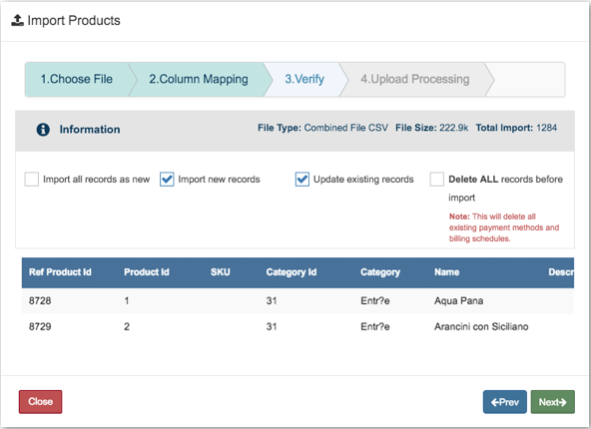
Step 4: Verify
Verify the information. This step lets you update your current product database with your imported file. This step will allow you to do the following:
- Important all records as new (Checking this box will have all the information into imported file as new).
- Import new records (Checking this box will upload new products information).
- Update existing records (Checking this box will automatically update your existing and new records).
- Delete ALL records before import.
Step 5: Processing
This window shows you the status of your upload, confirming the number of remaining uploads, successfully imported data, and skipped data.
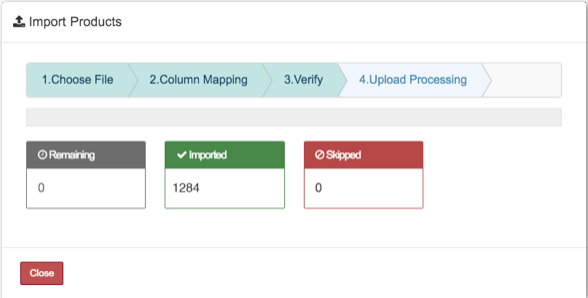
Click  when you are done. You will be taken back to your Product Database page.
Search For A Product
Search the Product Database by the following methods:
- Using the Open Search option
- Search for a product by Category
- Search for a product by Warehouse
Open Search
Click  the located at the top right hand side of your page.

The Open Search bar will appear. Enter a specific word or information that is affiliated with the product you are searching for. As shown in the image below, the merchant is looking for a specific product name with the word 'Gold'. All product with the word 'Gold' will then appear on your page.

Search Product By Category
Click on  , located at the top right hand side of your page.
A drop down menu will appear where you can view all your products by category. The drop down menu shows all your categories and the corresponding number products in that category. The image shown below shows that the merchant wants to search for a product from the ‘Accessories’ category.
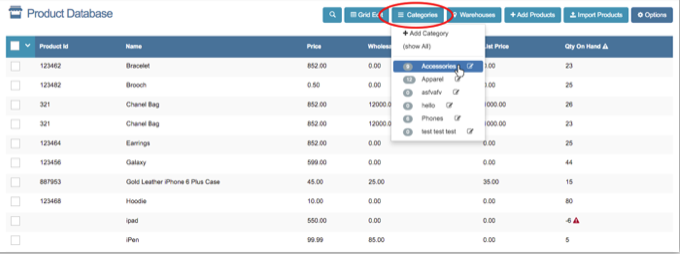
Click the Category you want to view. Your page will automatically show all the products in the ‘Accessories’ category.
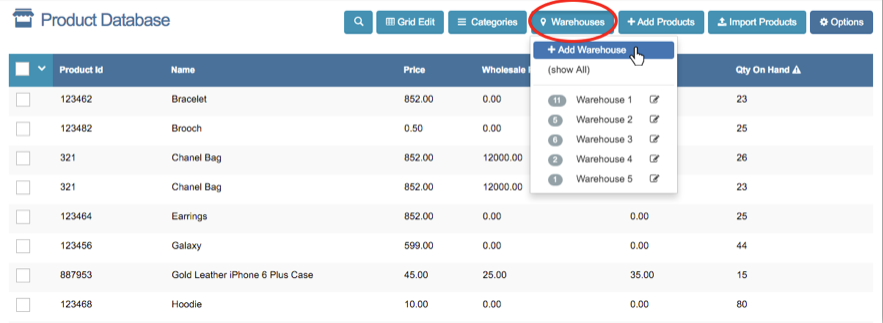
Search Product By Warehouse
Searching for a product by Warehouse is similar to searching for a product by Category. Click 'Warehouse', located at the top right hand side of your page.
A drop down menu will appear where you can view all your products by warehouse. The drop down menu shows all your categories and the corresponding number products in from that Warehouse. The image shown below shows that the merchant wants to search for a product from ’Warehouse 1’.
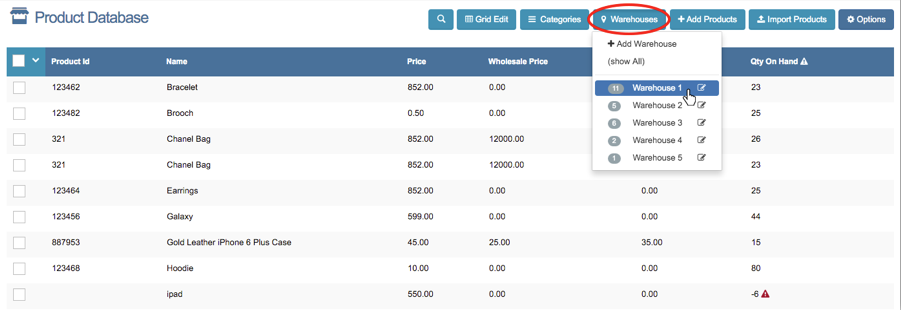
Click the Warehouse you wish to view. Your page will automatically show all the products from the selected warehouse.
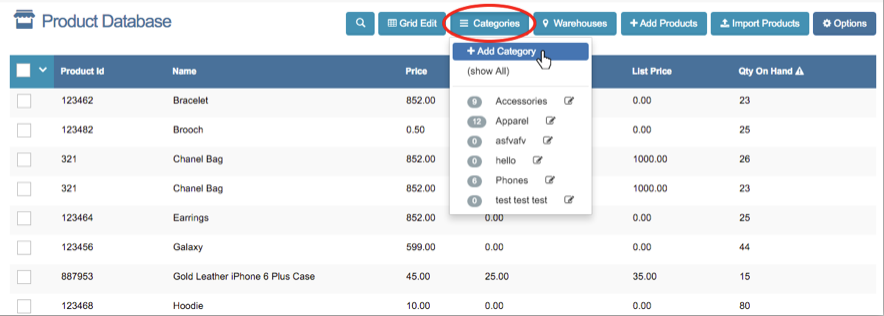
Add a New Category
Click on 'Categories' located at the top right hand side of the page. Select ‘+ Add Category’ from the drop down menu.
Enter the name of the category on the ‘Category Name’ field then click 'Save'.
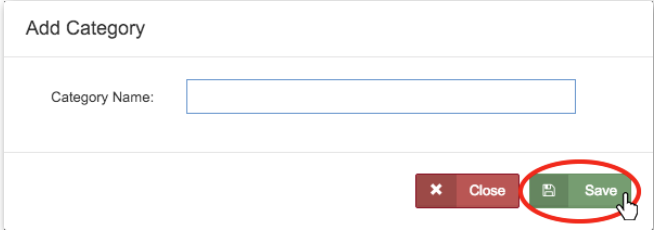
Your new category will automatically be added to your Category list.
Add a New Warehouse
Click on 'Warehouse' located at the top right hand side of the page. Select ‘+ Add Warehouse’ from the drop down menu.
Enter the name of the warehouse, the Warehouse ID, and the Description on the corresponding fields then click 'Save'.

Your new warehouse will automatically be added to your Warehouse list.
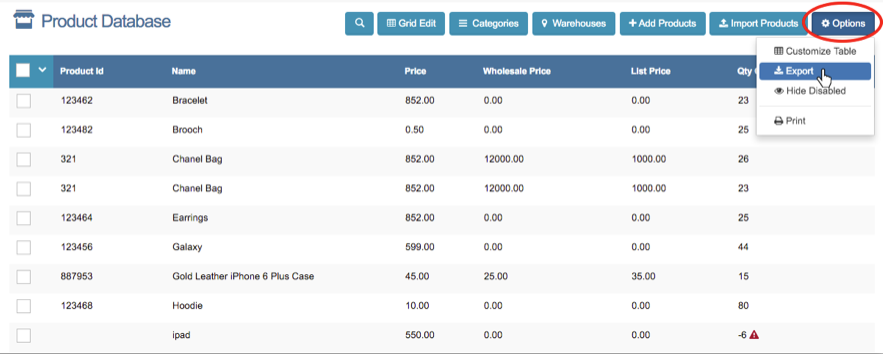
Export Products Database
To export your Product Database data, click located at the top right hand side of your page then click ‘Export’ from the drop down menu.
Select the file format you want your data to export as (a CSV, Tab Delimited, or JSON file).
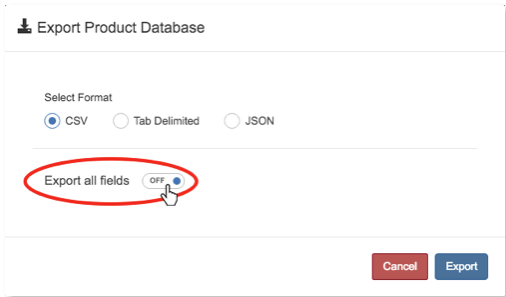
You can select to export all fields by clicking the ‘Export All Fields’ off and on switch icon. Click 'Export'. Your file will automatically download on your web browser.
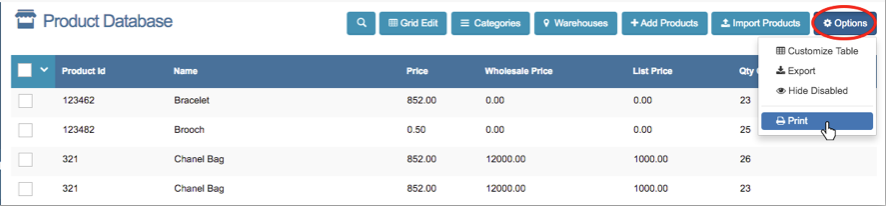
Print Products Database
To print your Product database data, click 'Options' then select ‘Print’ from the drop down menu.
Once you select ‘Print’, a PDF print window will pop up on your web browser. Click 'Print' to print your PDF copy.

Please Note: The exported and printed files will only contain information displayed on the Products page. To add more fields into your files, see the Customize View section of this page.